How to Create a Secure Membership Site with Squarespace using Member Areas (without 3rd Party Programs)
Squarespace is hands-down my favorite website provider for small businesses, bloggers, and content creators alike.
And it just got better.
If you’ve ever thought about creating a password protected area on your website or envisioned what a members-only area could do for your brand, then it’s the perfect time ever to take action. Why now?
Because Squarespace just rolled out its latest feature: Member Areas.
If you’re wondering how to create a secure membership area on your Squarespace website (without a 3rd party program), then this tutorial is for you.
My Membership Space Dilemma
The timing couldn’t have been more perfect because I was in the midst of outlining the content and features of a subscription service coming soon to Ponder Trail. My goal was to create a membership that would help creative entrepreneurs with brand and business strategy.
My offering was coming closer and closer to fruition, but I was still on the hunt for the perfect program to protect my content and create an actual membership subscription space on my website.
I wanted to create a subscribers-only area that was secure and inexpensive. But mainly, I didn’t want to use a secondary platform or host my content off of my website; I wanted it to be a seamless extension of my brand.
Options did exist for creating a membership and hosting it on a Squarespace website, but the paywalls always seemed a bit glitchy and unprofessional. And being a brand designer (and thus, prioritizing the user experience and design of my member space), I still wasn’t sold on any of the well-know platforms.
And just like that, Squarespace rolled out the perfect option: their shiny, new Member Areas feature.
I’ve been hoping they would launch the ability to do this on my website for several years now, and I’m excited to share all of the details and how-to’s of creating a Squarespace membership site in today’s blog post. Let’s dive in!
What is a Squarespace Member Area?
Squarespace’s new Member Areas is exactly what it sounds like: a members-only area you can create on your site. This long-awaited feature lets you create a password protected area on your existing website.
You can create a new income stream with a paid, subscribers-only area, or you can build a free, exclusive space for your email subscribers. The choice is up to you, and the possibilities are limitless.
For only $9 a month, this Squarespace add-on gives you countless ways to be creative and provide amazing value for your audience, clients, and customers. Not to mention, you can utilize this new tool to grow your business and your bottom line.
Why is a Squarespace Member Area a great option for your business?
Automatic integration and backend
The Member Areas feature integrates automatically without the need for another program or paywall company to keep your pages secure. Plus, there are no worries about people bypassing third party content blockers, which has been an issue many business owners faced. It also saves you time from researching companies and options for where to host your members.
The best part is that Member Areas integrates with other information on the back end of your website. For example, all of your customers and members can be managed from your Squarespace settings, and you can easily filter them to make it easy to stay organized.
Easy to use and set up
Member Areas is also easy to set up and use. Depending on what type of subscription you are offering and the type of content it involves, it’s possible to create and launch your membership in just a few hours or days.
All you need is a great idea, strategic planning, and a little bit of set-up, and you’re on your way to your latest business offering.
Visual extension of your brand
One of my favorite aspects about Member Areas is that it matches your website’s branding seamlessly. Since it’s part of your Squarespace website, all of your fonts and colors will automatically be set and ready to go. This gives your subscription membership a professional and top-notch feel since it takes away the need for clunky or unlatching software.
Features and Options of Squarespace’s Member Area
At the moment, Squarespace is keeping things simple and gives you a few options as you create your secure space for members.
Build multiple member areas on your website. Depending on how many separate spaces you want to make, you can choose a Squarespace add-on plan that’s best for your business.
Create a free membership or charge for your subscription. Want your private area to be free for your clients? Or do you want to use it as a new source of income? The choice is up to you.
Choose how often you charge for your membership. How often do you want a subscription fee to incur? Weekly? Monthly? Ever three months. Squarespace currently gives you the option to select one schedule for your membership’s fee. Changing the fee settings only affects new members.
How to Create Your Secure Membership Space
Next, let’s break down the steps to create your member area on your Squarespace website.
1 // Come up with your irresistible membership idea
First, determine what you want your membership to be about, how much time you can dedicate to it, and what type of content you will create. This is key to growing a successful member space that your audience will love and value. So be sure to keep your audience’s needs in mind while you brainstorm.
It’s so important to come up with a membership idea that will be valuable, profitable, and seamless with your brand. Every part of your brand should fit together, and your subscription space is no exception.

2 // Create your membership sign-up page
Before you launch your password protected area, you’ll want to create a sign-up page so people can join. You can keep it in the unlinked section of your website until you are ready to launch.
Design an engaging page that fits with your brand. Write captivating copy that highlights the value of your membership and how your audience will benefit from it. Think of it as a non-sales-y sales page that focuses more on how your service will help them.
Aim to make it both detailed and to-the-point because the goal of your sign-up page is to give your audience a clear picture of what it will look like once they join. Tell them what features are included and what to expect once they subscribe to your membership. Be transparent about how pricing works, too.
This page will be the one you link to when promoting your subscription space. It won’t live inside your Member Area because you want everyone to be able to access it.

Hint: After you upgrade and activate your Member Area, you’ll want to revisit this page and re-add any sign-up buttons (see step 6 below). You can add this while you build the page, but I found that I had to come back and add the button again because it didn’t show up. I think Squarespace considers the sign up buttons “samples” until you actually upgrade and officially have the Member Area feature on your website, so I wanted to be sure and mention that tip!
3 // Set up your Member Area
The nice thing about Member Areas is that you don’t have to start paying for the feature until you are ready to launch. Right now, Squarespace allows users to build a Member Area ahead of time to try it out. By default, this feature should be available on your website.
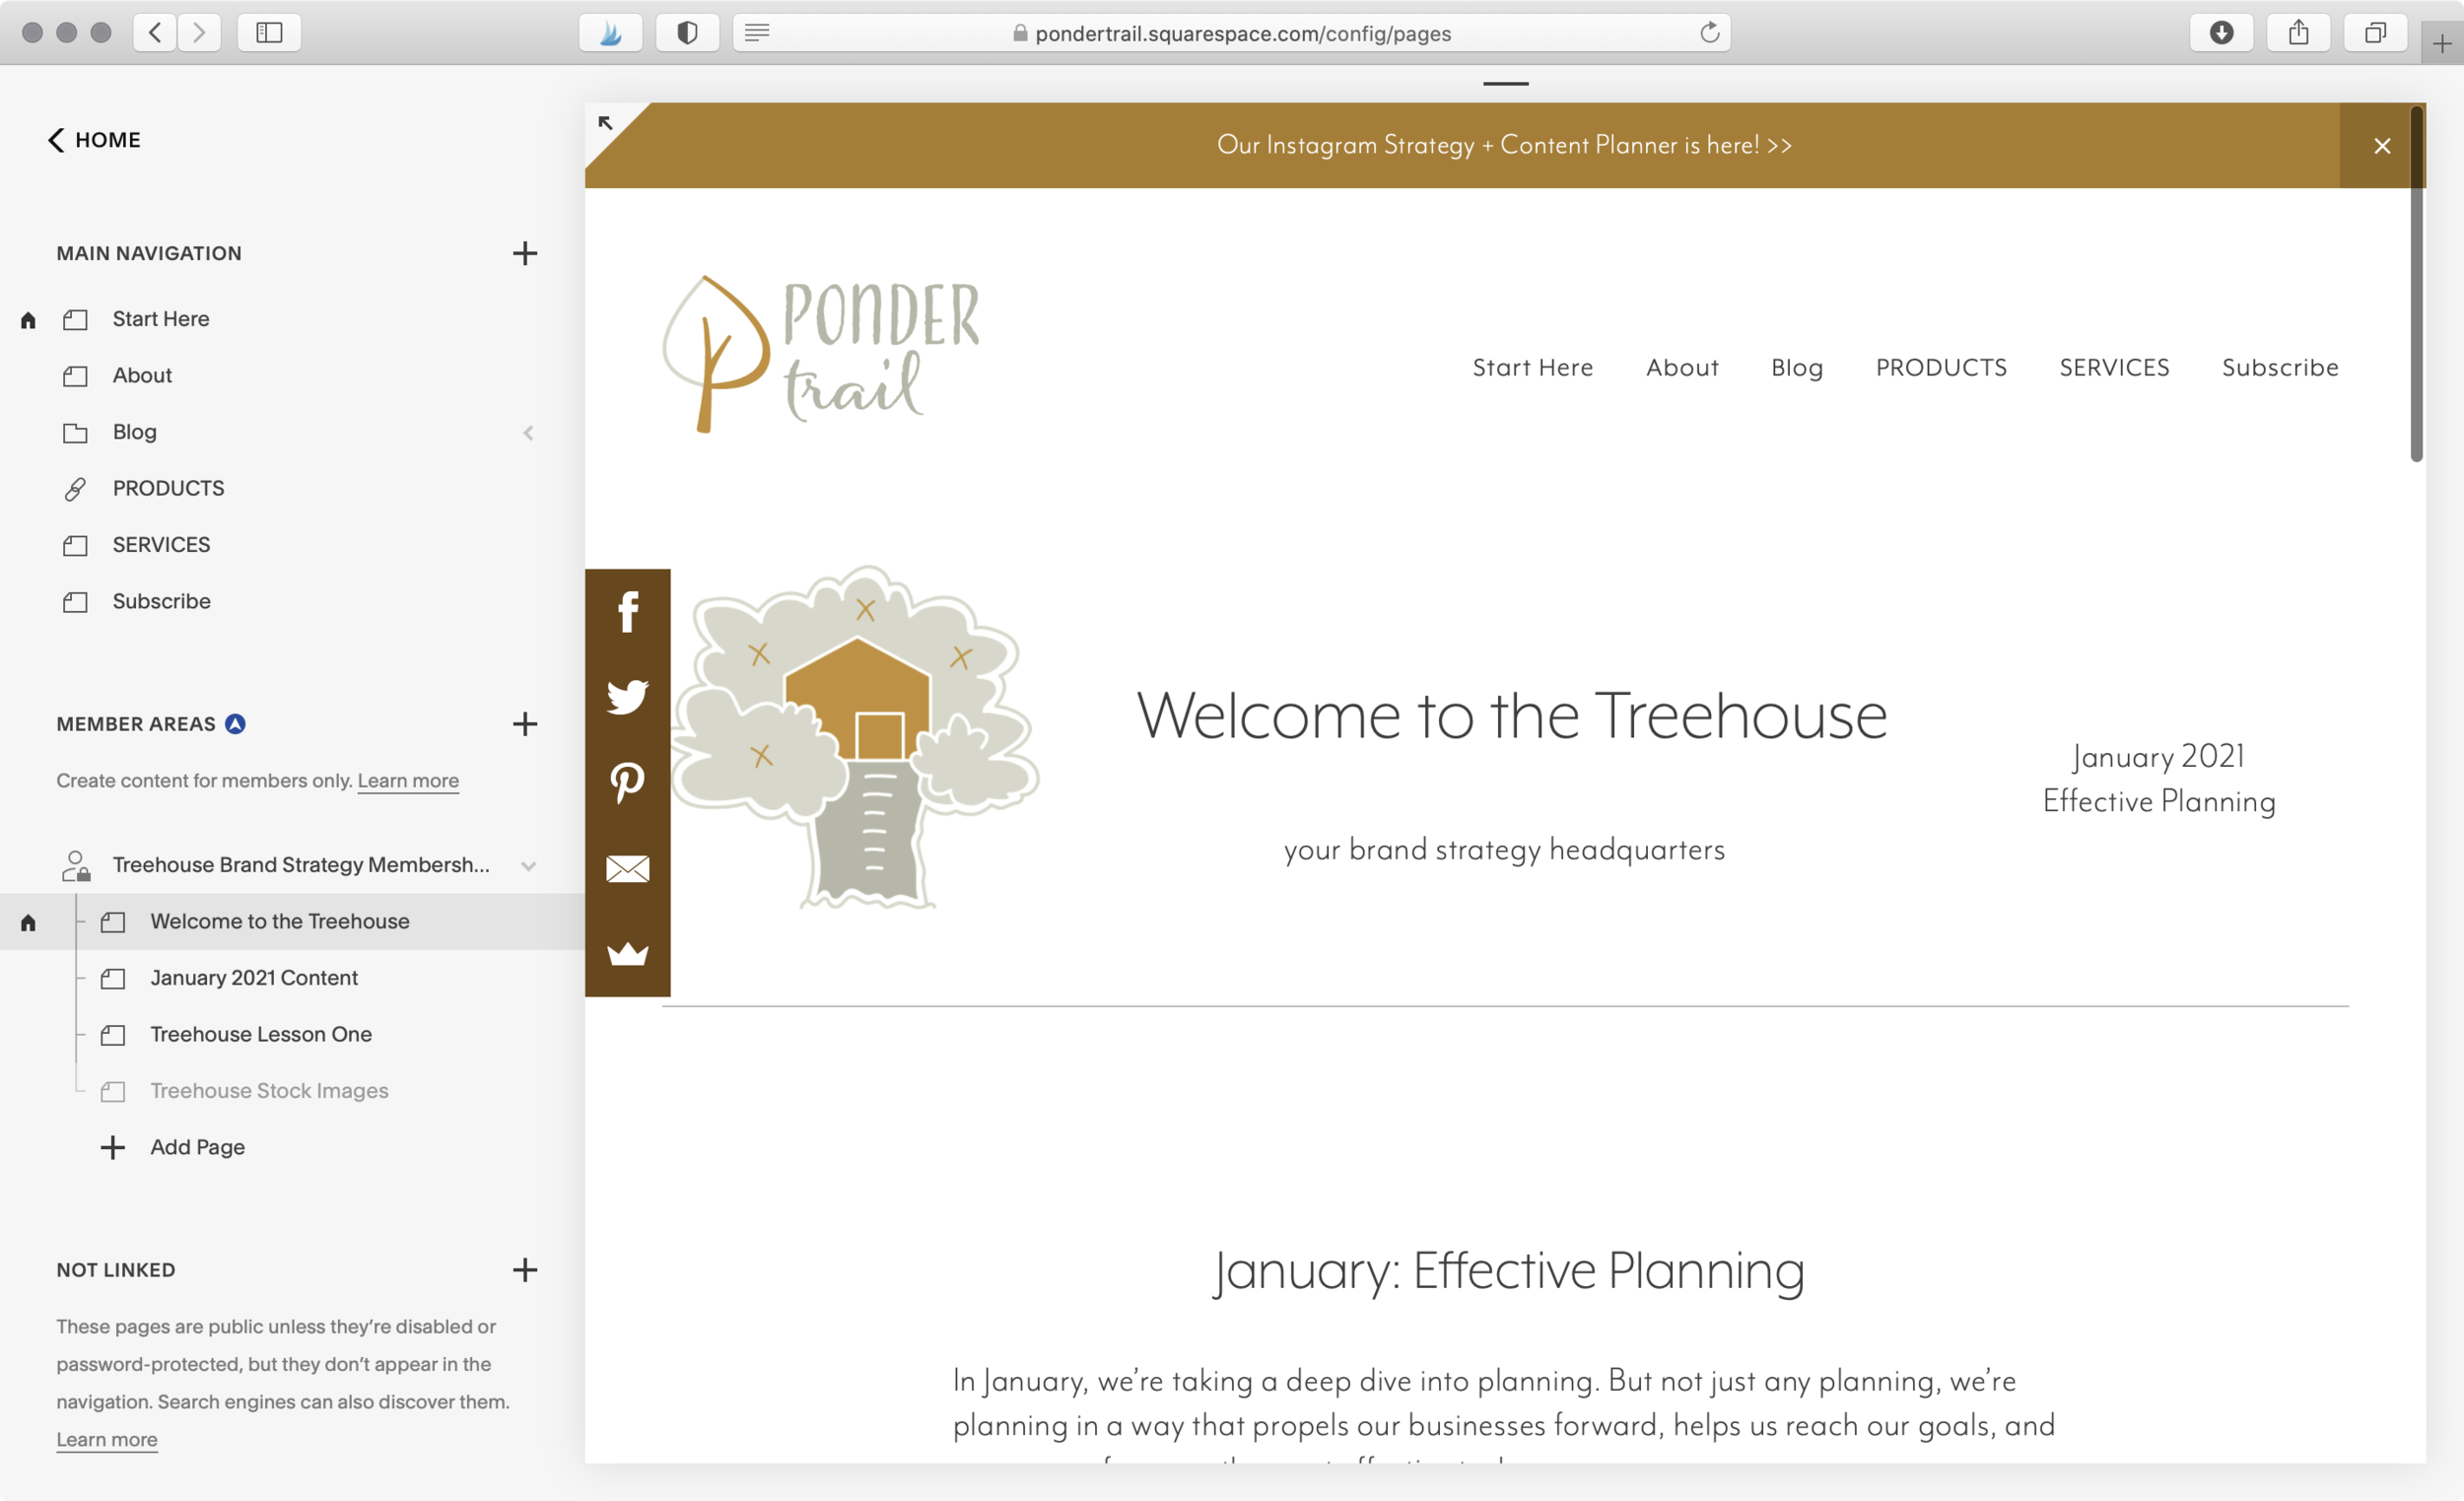
When you go to the Pages section of your website, you’ll see a new section for Member Areas feature along the left side in the menu. It’s located between the “Main Navigation” and the “Not Linked.” This spot is where all of your member area pages will live.
Click the plus sign icon to open a pop-up window to begin. Click “Set Up Member Area.”

Hint: If you don’t see the Member Area section in your pages menu, you can turn it on from within your settings. Click back to the “Home” menu. From there, navigate to “Settings.” Then, click “Member Areas.” There you can toggle on or off the feature to try it out on your site. Once it’s highlighted, head back to your pages to find it.
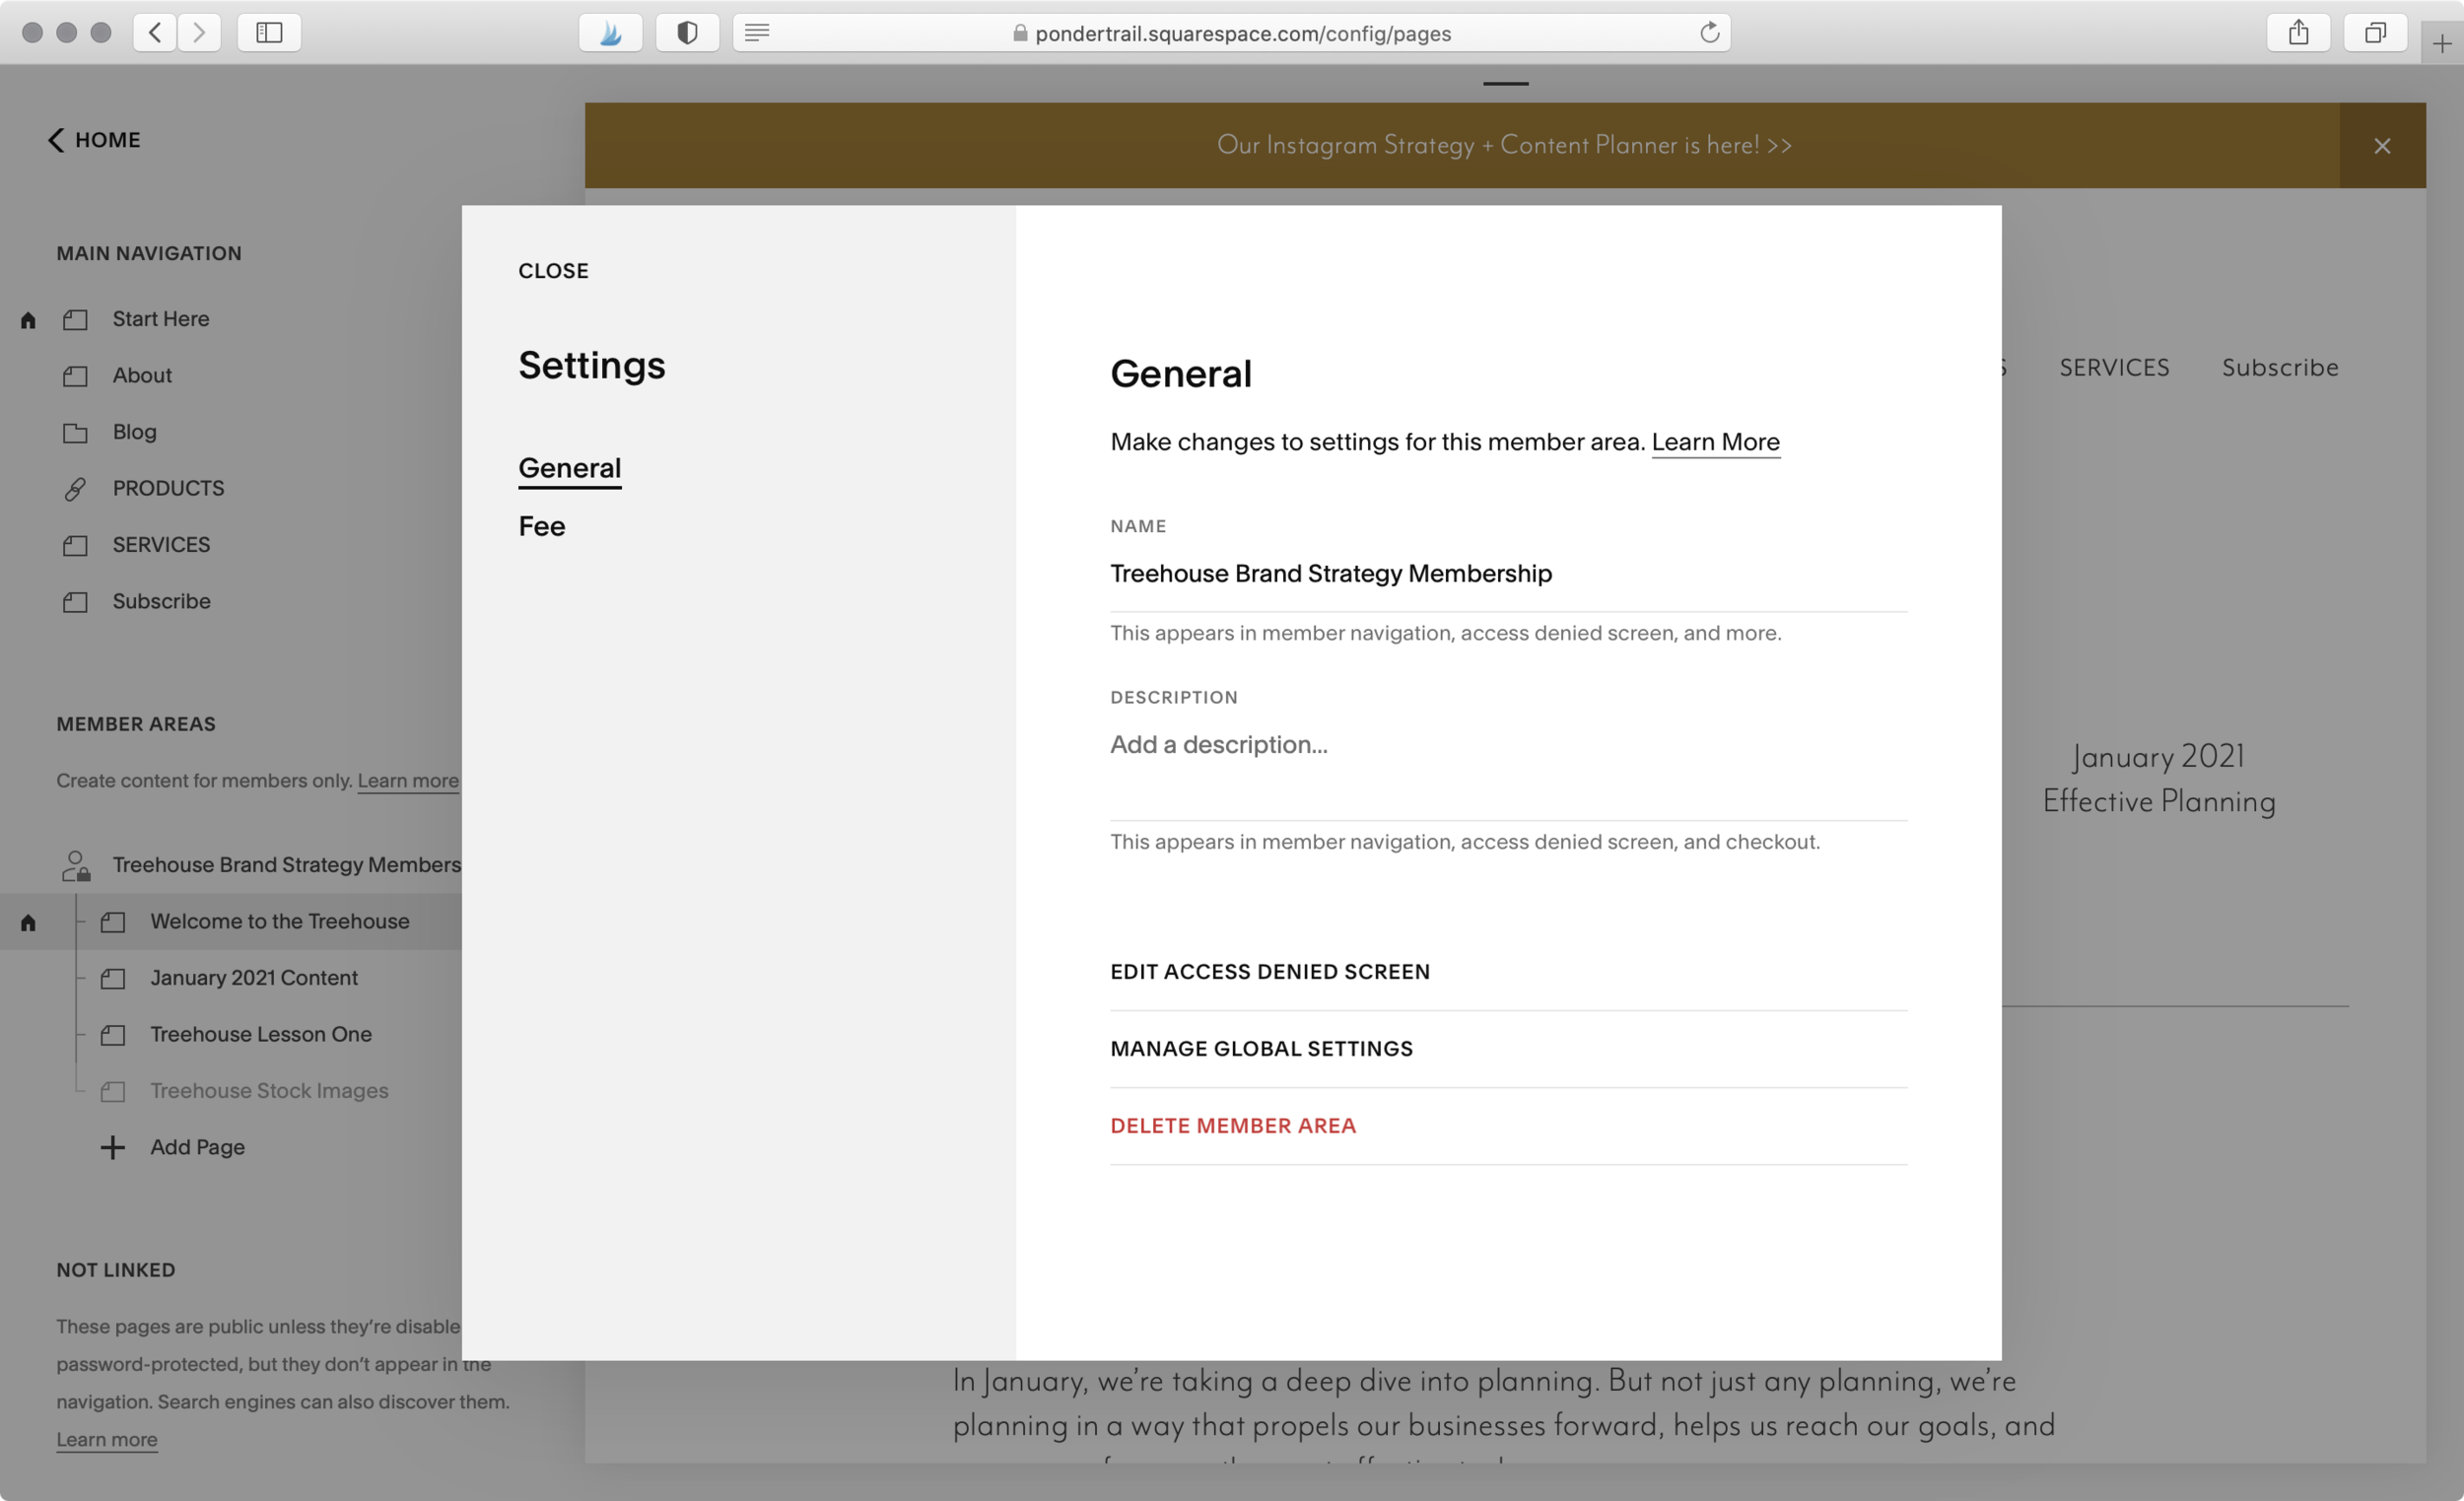
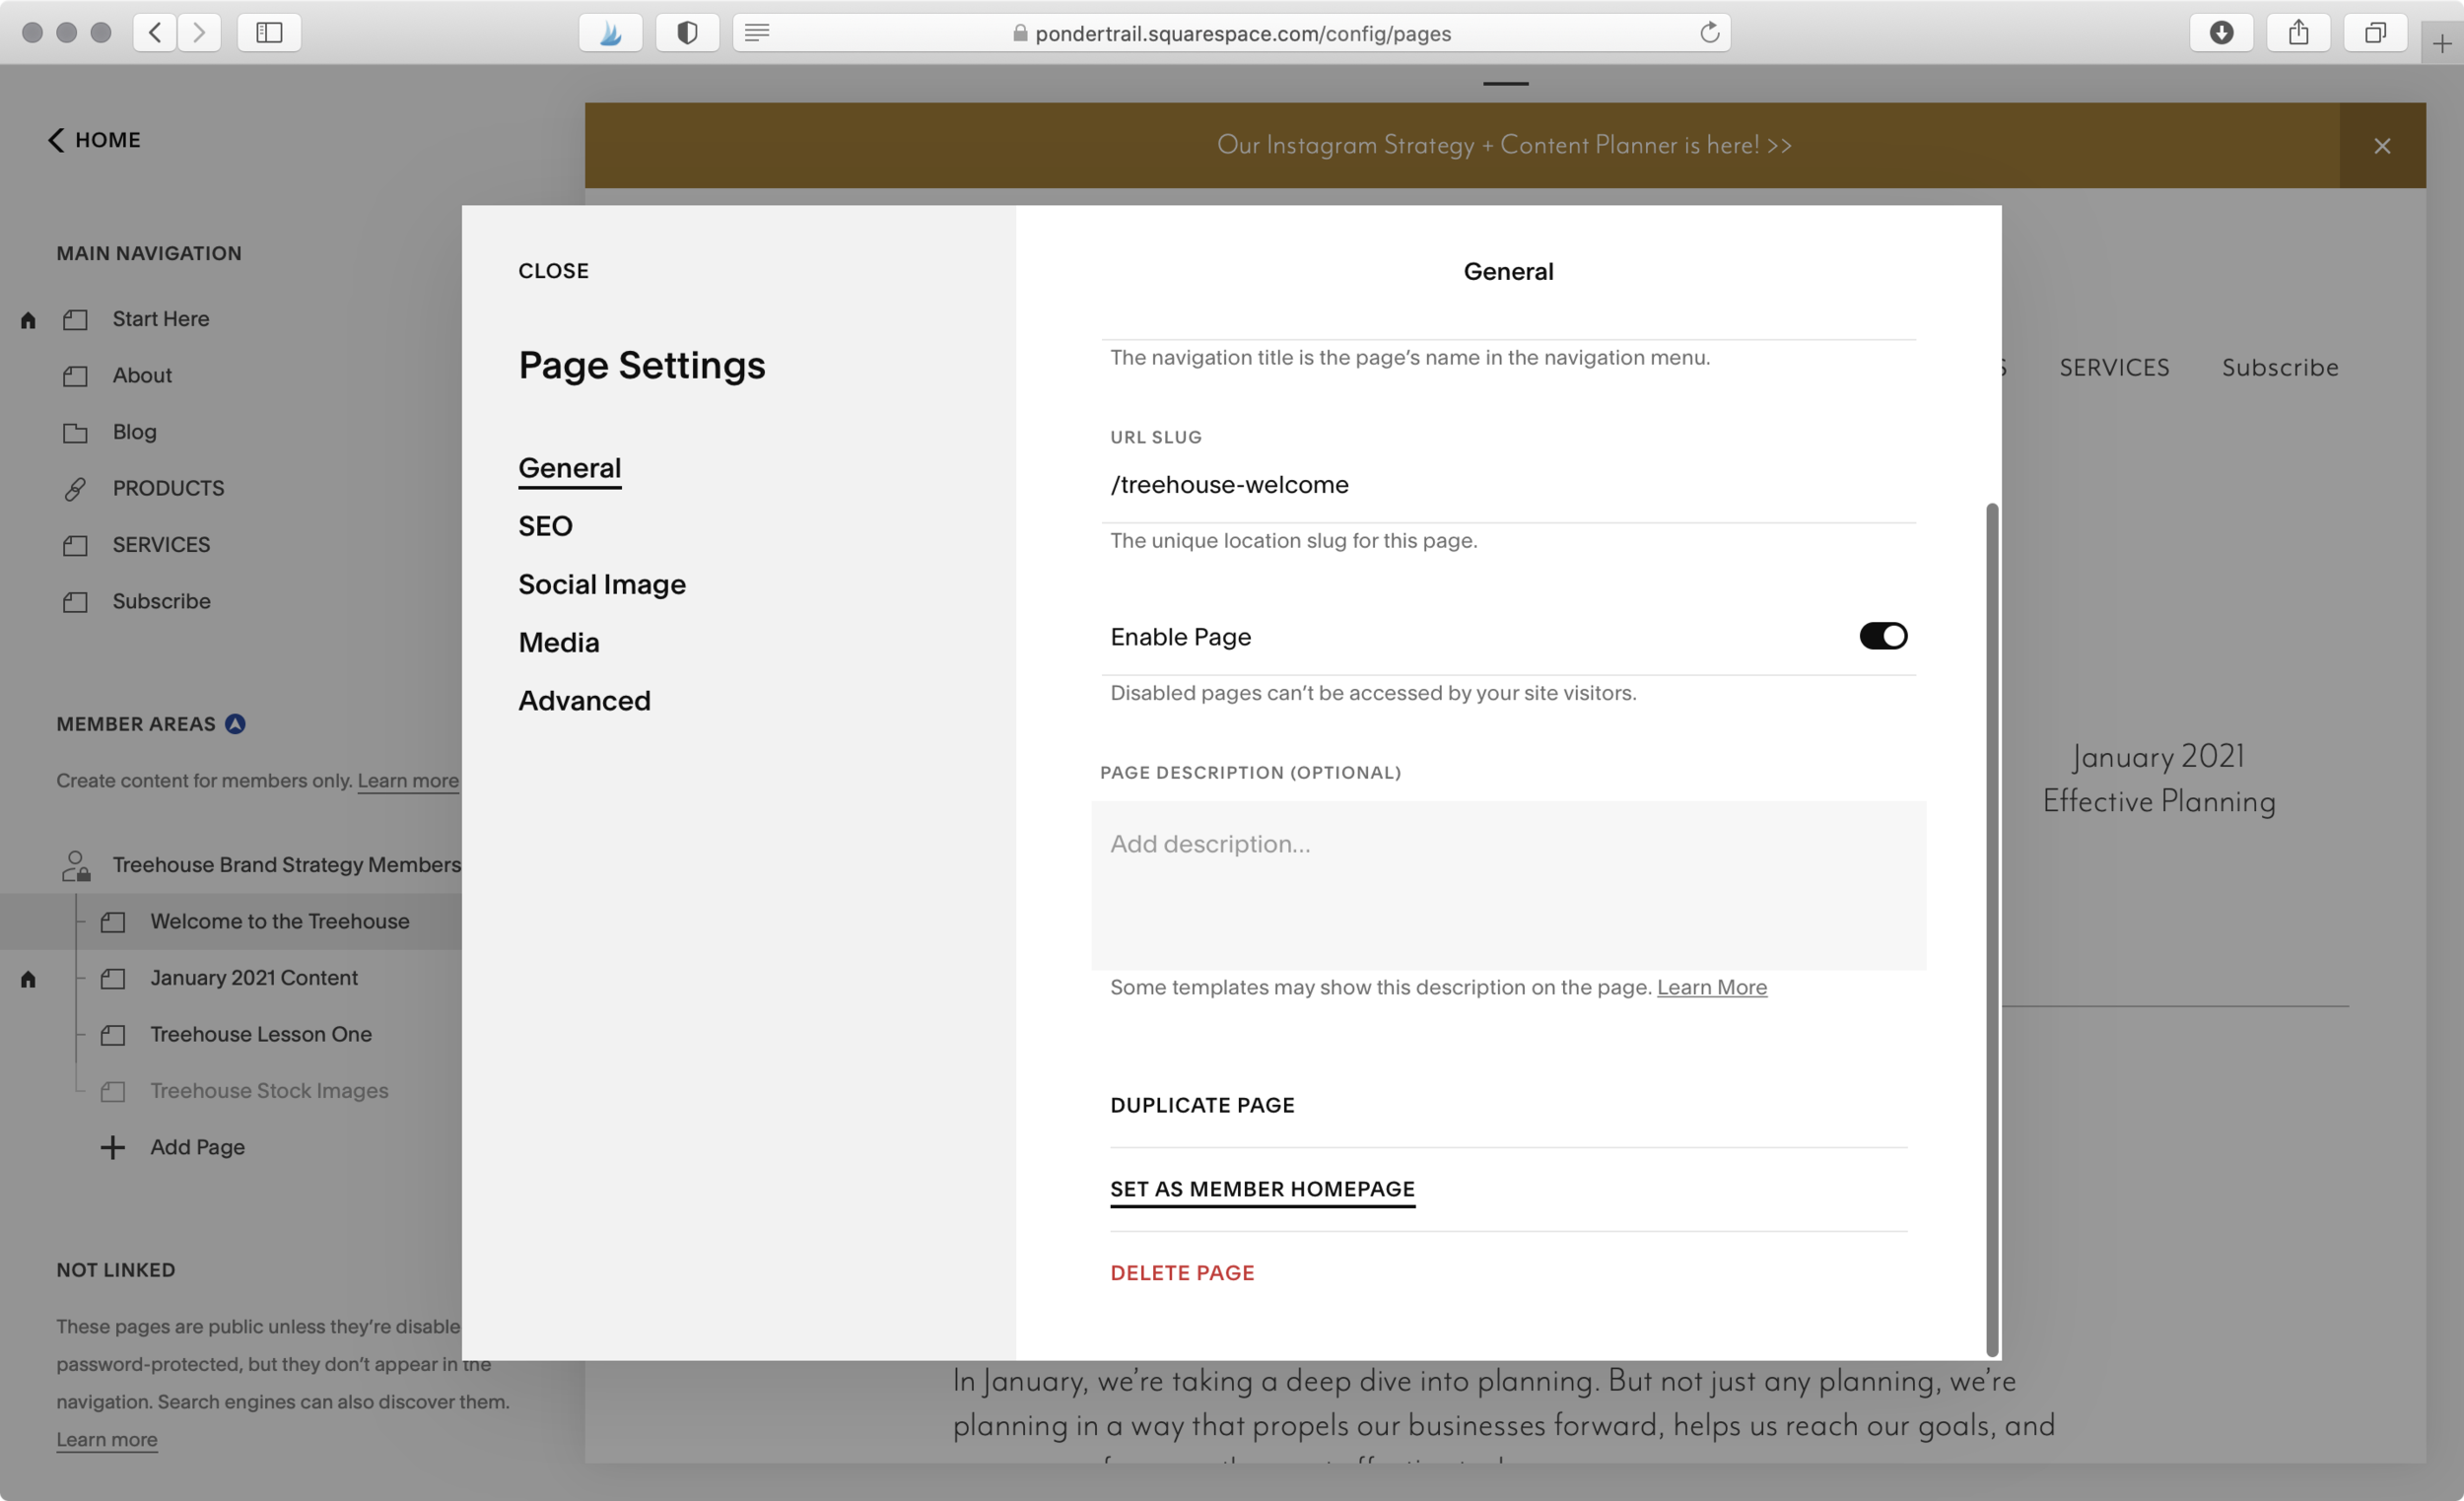
4 // Name your member area + set your subscription fee
Next, click the gear icon to change the settings of your Member Area.
Decide on a name for your new member area.
Set your fee and determine how often you charge members.

5 // Build your internal Member Area pages
Think about the best way to house your membership content. With Squarespace Member Areas, you can include as many pages as you’d like within your protected subscription space.
You can create a home page that serves as a menu, or put everything on one page.
Consider the features of your subscription and decide on the best way to lay it all out. Will you use photos? Graphics? Text? Do you have video content, podcasts, blog posts, or documents to include? Think about all of the components and how you’d like to integrate everything together.
Keep your audience in mind, too, and what will be the most user-friendly experience for them.
This will be key in retaining subscribers because there’s nothing worse than a clunky website experience—especially when you’re paying for it.
Go ahead and name your pages and add the slugs (the part of the url that follows the forward slash after your domain name) to ensure you links are exactly how you want them.

Then, go through and link your internal pages together.
If you have multiple pages, set the homepage of your member area by clicking on the page’s gear icon in the page menu on the left-hand side of your screen to open the settings for that page. Then, click “Set as Member Homepage.”
6 // Activate your new Member Areas on your Squarespace website
Once your exclusive area is complete, it’s time to upgrade your website and add Member Areas to your plan (if you haven’t already) so you can monetize your content with just a few quick clicks.
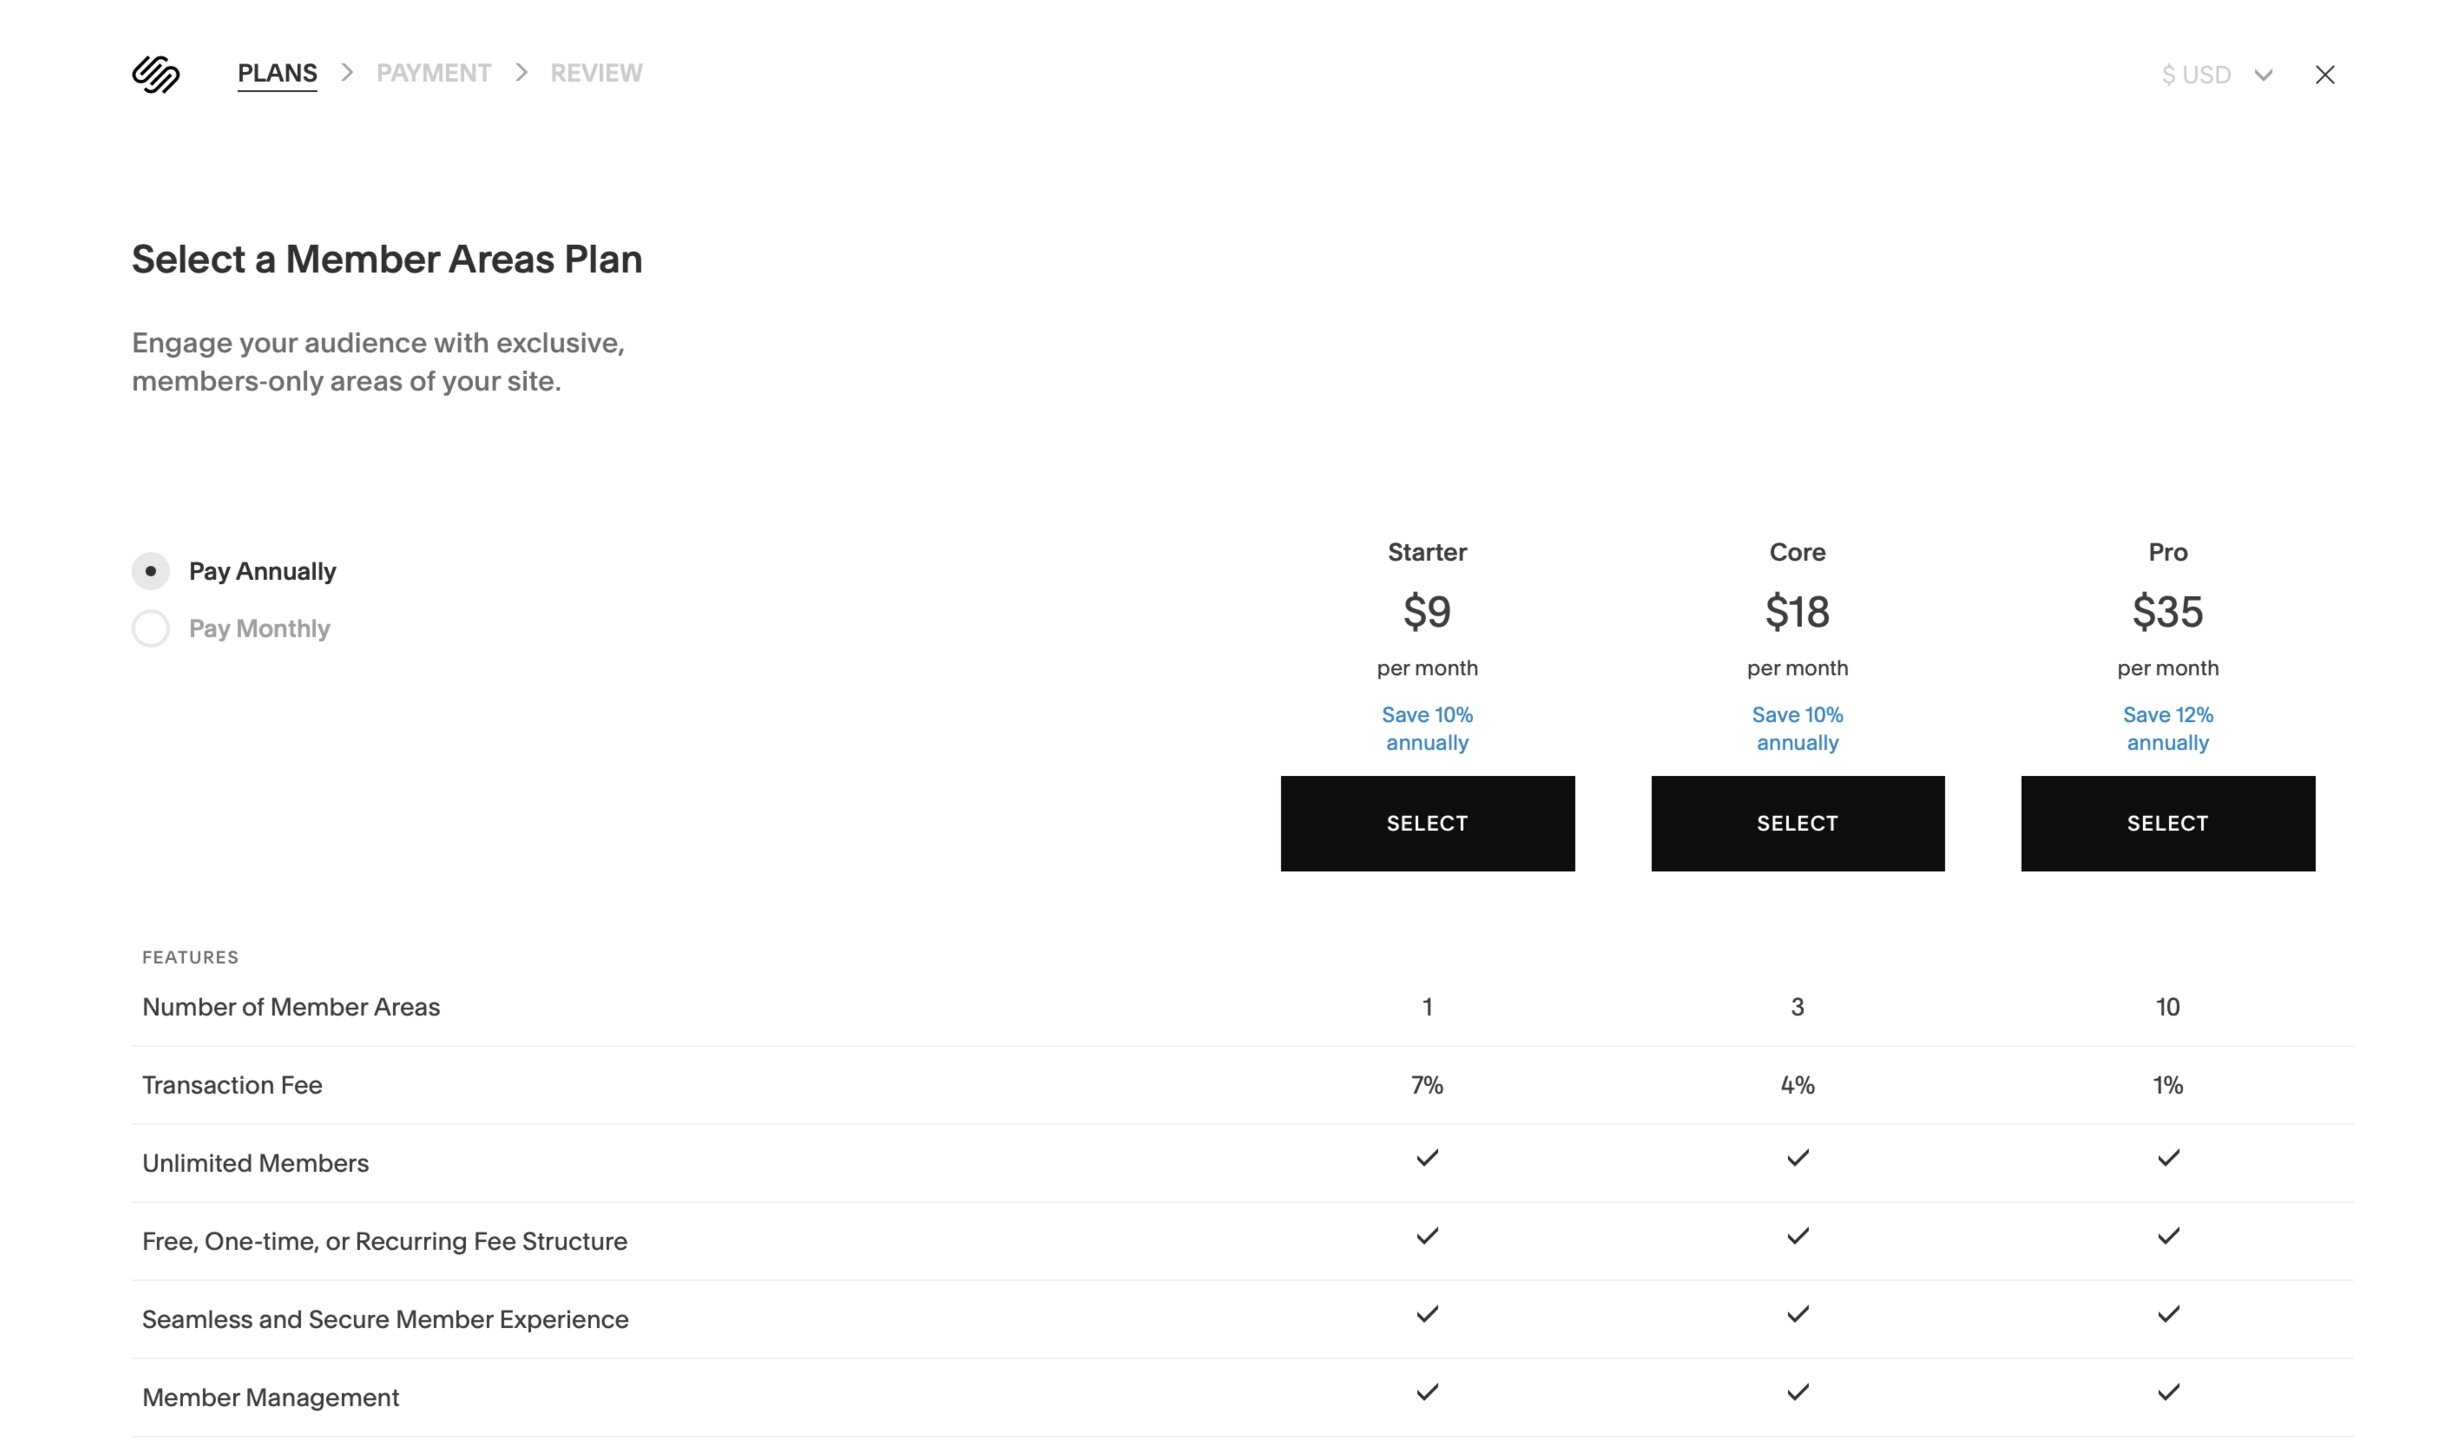
Look at the top of the Member Areas menu on the left, and click on the blue circle with arrow that denotes an add-on feature. From there, you can select your plan, and you’re good to go!
Plans start at $9 (annual payment) or $10 (monthly payment), which should have all of the features needed for most creative businesses.
7 // Re-add the sign-up button on your sign-up page
As I mentioned in step 3 above, go back to your sign-up page and add a new “Member Sign-Up” block (click the teardrop insert icon and scroll down to the “More” section to add the button) so people can join. Otherwise any buttons you added before paying for the add-on might not work or appear on your live website.
Now you can start getting subscribers!

8 // Launch and promote your new Squarespace membership site!
And that’s it!
Share the link to your new cover page on social media, and feature it on your website.
If you’d like help creating your own Member Area, feel free to reach out! You can take a look at my branding and strategy services for creative entrepreneurs here.
Hint: Make sure your sign-up page is not located in the protected folder because that will hide the page from potential members.
Future Squarespace Member Area Enhancements
I’m looking forward to seeing if Squarespace adds a few more options and features like...
Ability to set up different payment options so subscribers to choose to pay monthly, quarterly, or annually.
Ability to add sign up links to a Squarespace cover page.
So there’s a guide and overview of the new Squarespace feature!
What do you think of Member Areas? Do you think you will try it out for your business? What ideas do you have for creating a membership area on your website? I would love to know!