Creating a Responsive Filterable Gallery in Squarespace
Have you ever wanted to create a responsive gallery to feature different collections of your work all within one page?
While Squarespace doesn’t have a content block to create this magic, I do have handy trick I’ve used in various ways across my website. This method actually uses several pages, and the results are so similar to a one-page feel that your audience will hardly realize it while your responsive gallery changes with a click of a button right before their eyes.
On this “one page,” your audience can select different categories to view. And they can easily toggle between these filtered views without losing their bearings or ever having to click the <— Back button of their browser.
Similar to a storefront with categories listed at the top for easy sorting, this Squarespace work-around has many uses.
Let’s jump right into today’s step-by-step tutorial!
Filterable Squarespace Gallery Design
If you would like help creating a filterable gallery system on your website, I would love to chat with you! Send me a message on my Squarespace Filter Design Service page to get started.
Branding + Squarespace Website Design
Looking for help with your Squarespace website? Then, you’ve come to the right place. I specialize in Squarespace website design for creative entrepreneurs. I work with small business owners to design one-of-a-kind brands and websites.
Ready to bring your creative business dreams to life and take your site to the next level? Take a look at my custom brand and website design service here to get in touch and schedule a free consultation call.
The Squarespace workaround:
Since Squarespace doesn’t currently have a feature that lets viewers toggle between different galleries on one page, we need to add a little creativity and a few extra steps to create this final effect.
The trick is to create a series of pages—one for an overview index page and one for each category. Each page has an identical navigation menu that lists the categories you can view. These menu titles link back to their corresponding pages.
This makes the gallery titles responsive so users can easily click around without feeling like they’re leaving the page. To clearly indicate what gallery is currently being viewed, its title in the menu is shown in bold text on its page.
What it looks like in action:
Here’s a video of how this filterable gallery works to help you visualize the final result as you work through the step-by-step instructions:
Ideas for ways to use this workaround:
Possible ways to implement this technique include . . .
Filtered photo gallery display // Perfect for photographers, this is a creative way to showcase the different types of photos you offer. Let your audience easily filter between portrait, wedding, family, newborn, etc. Or any other way you’d like to group your photos in a responsive, dynamic gallery.
Portfolio collections for artists // Highlight different collections of your works of art. Make it easy for your audience to find and view the pieces they’re most interested in. Here’s how: follow the steps.
New or featured products from your shop // Showcase your latest or popular products. Potential buyers can get a glimpse of your available items by easily toggling through select products from your shop.
Archives page for your blog or podcast // Let your readers or listeners quickly find the information they are looking for. Use this workaround to filter the topics your content is centered around.
Cover page for your products that link to an external website to purchase // Products that link to another site to purchase. Create a “store” on your Squarespace website that link to items in your external shop, such as Etsy or Shopify.
Here’s how I used this trick to sort my blog archive categories:
1 // Choose categories and content:
Categories // First, decide on the categories of content you want to feature. Choose titles for them, and figure out the order you want to list them.
These categories will serve as page headings. When clicked, each heading will reveal the photos in its category by refreshing the browser to that category’s page.
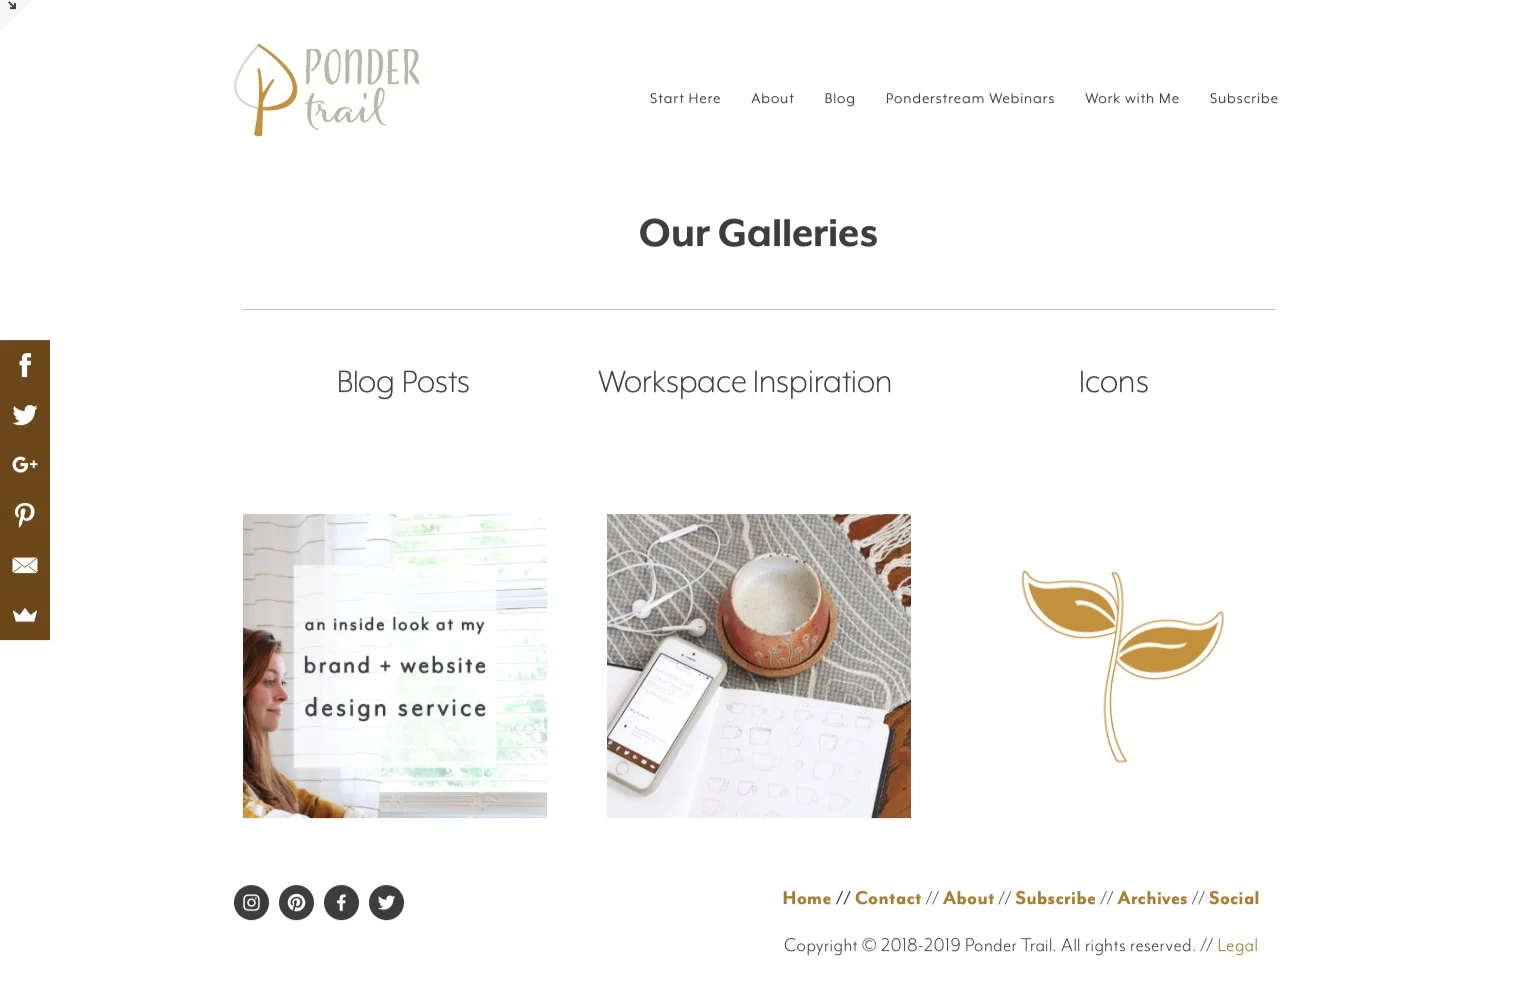
I chose “blog posts,” “workspace inspiration,” and “icons” as categories.
Content // Gather the images you want to feature across all of your galleries. Every image will be assigned to one of these categories. This will ensure each photo shows up on the proper page when someone clicks on its category.
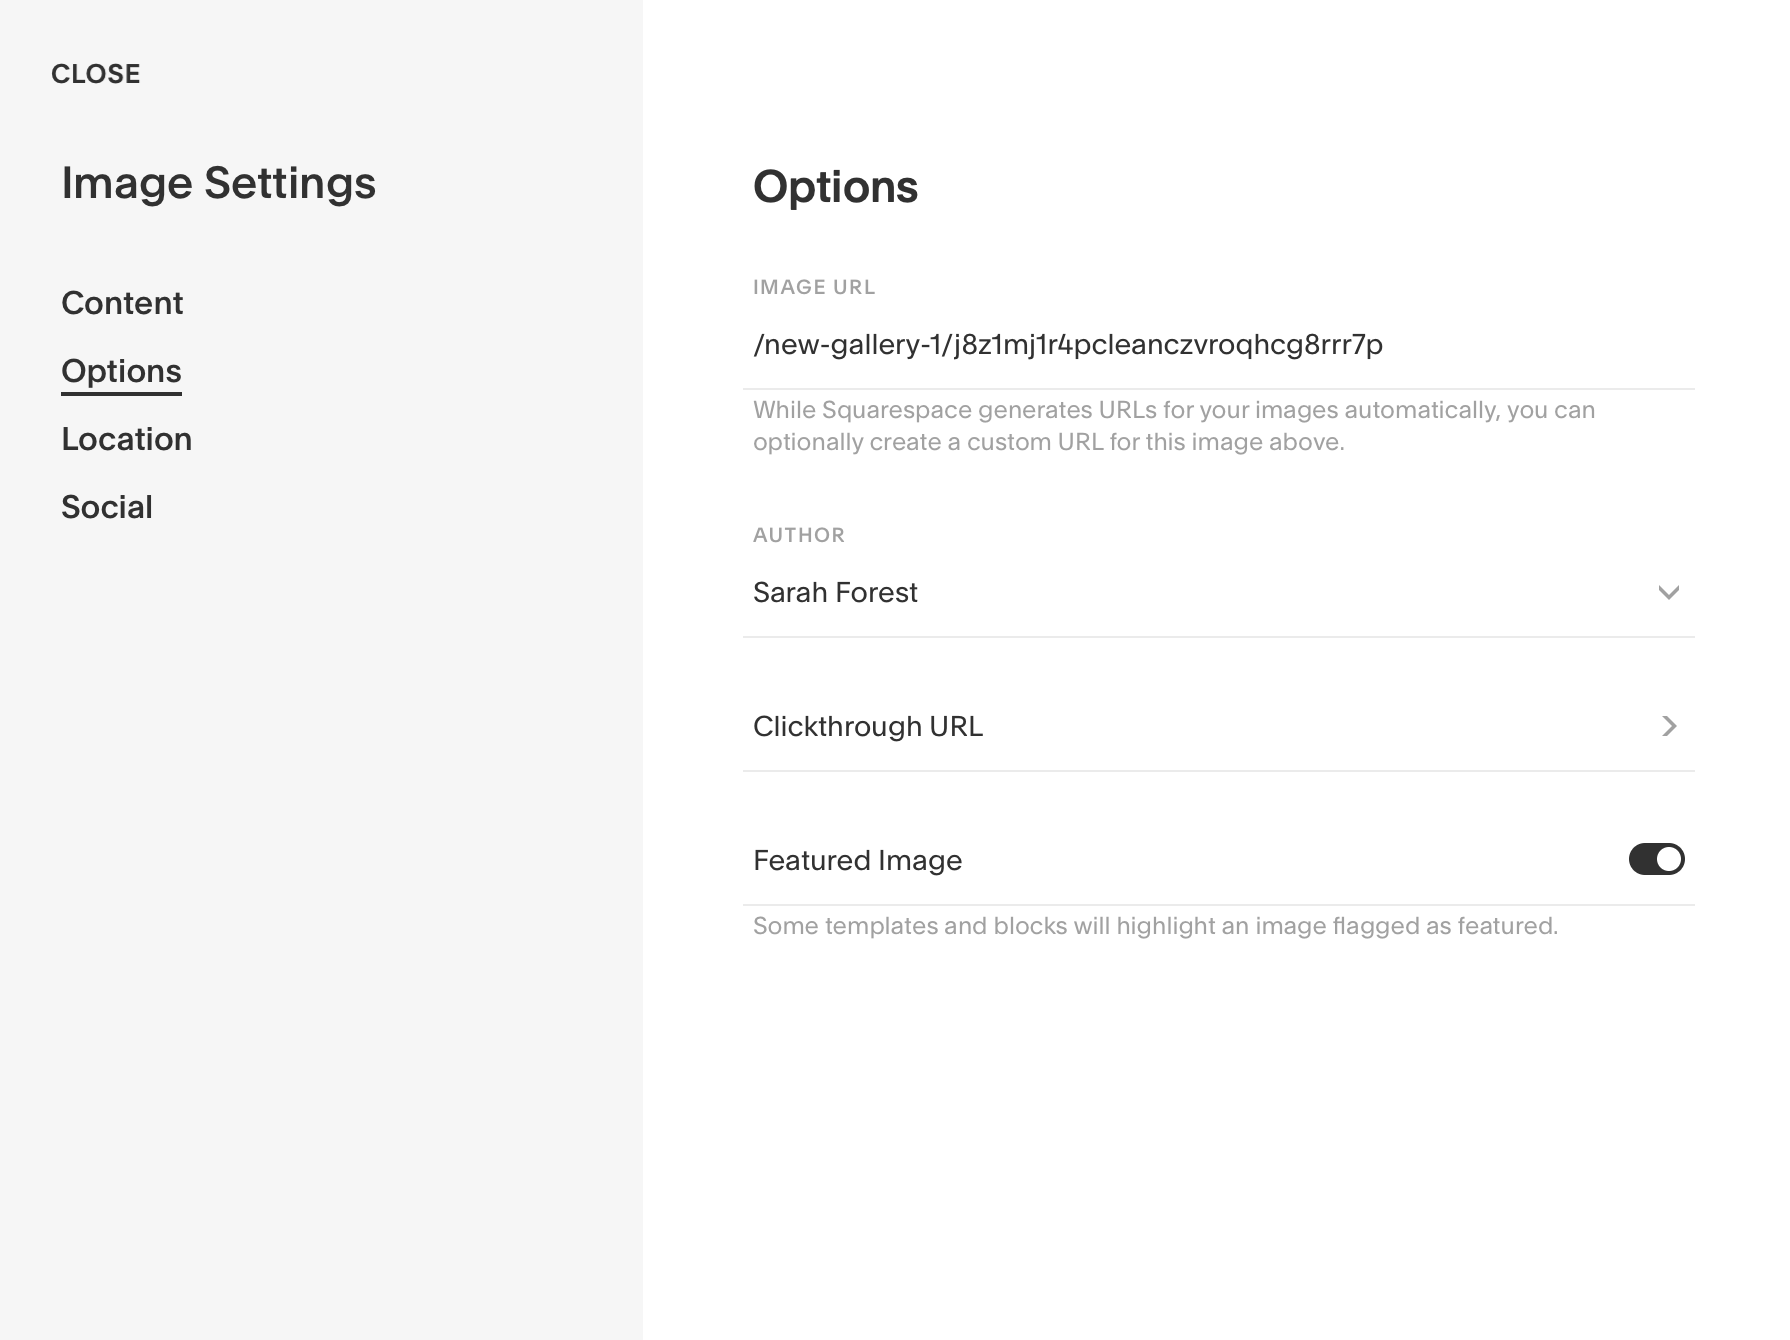
2 // Create a new gallery collection to house content and category tags:
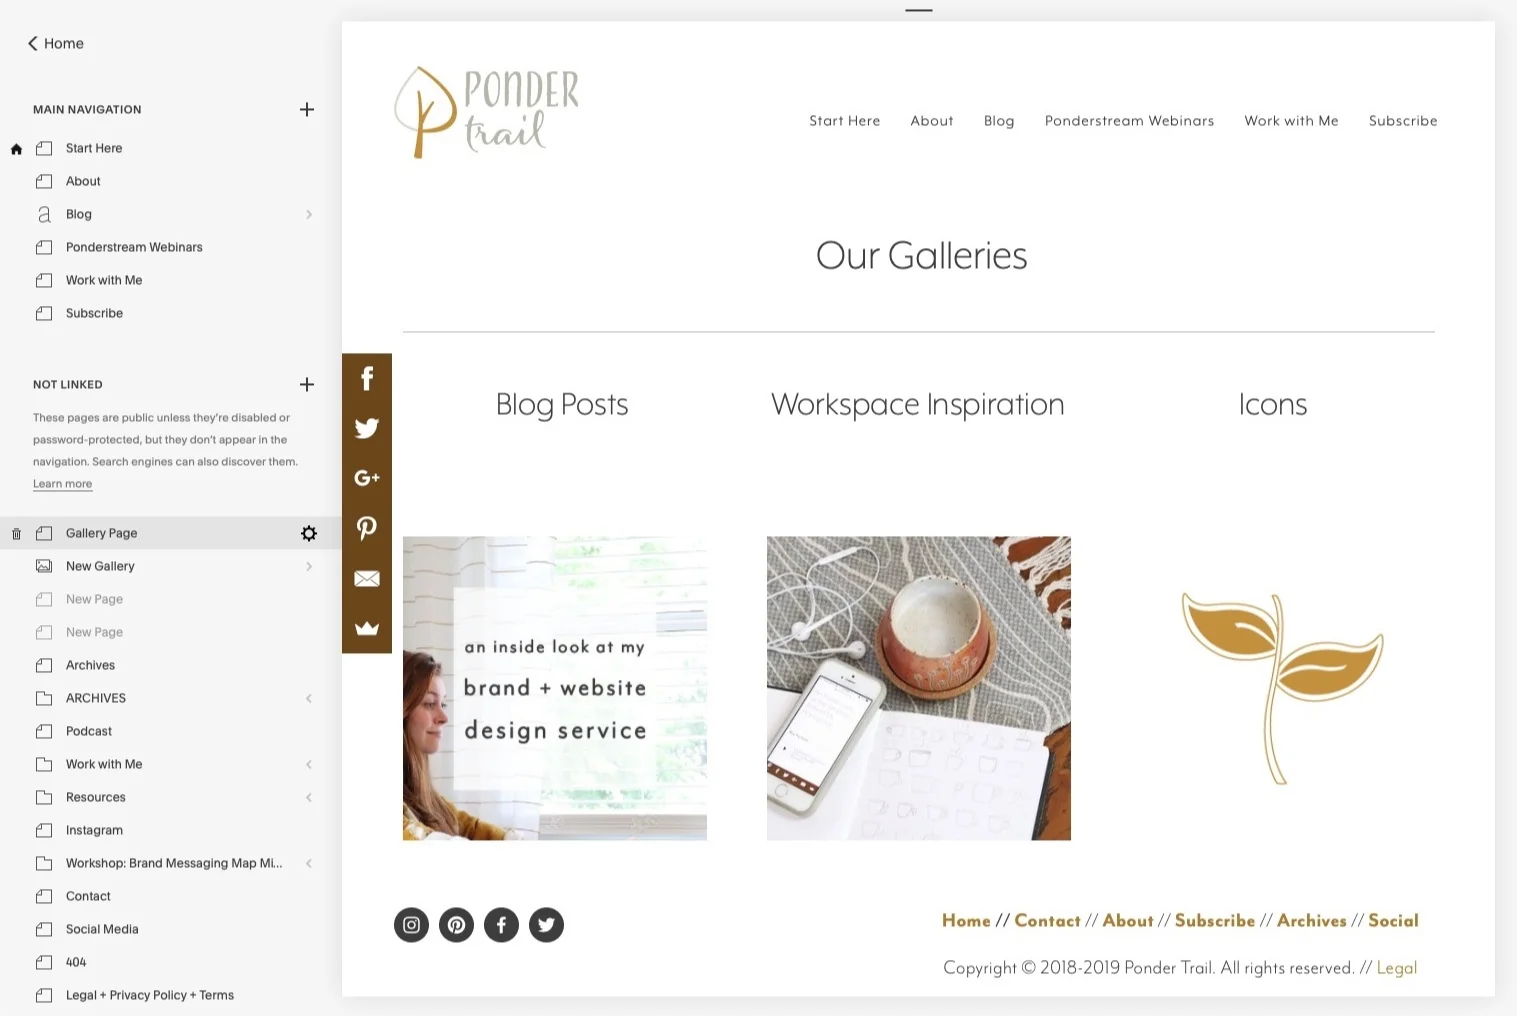
Create gallery collection // On the pages screen of your Squarespace website, click the plus sign in the “not linked” section to create a new page. In the menu that pops up, select “Gallery” from the options in the Collections section.
Type in a name for your page, and hit enter.

Add images // On your new gallery page, click the outlined box area to upload the images you want to include in the collection. Be sure to add photos for all of your desired gallery categories into this collection.
Hint: It can be helpful to add one category at a time to keep them separate in your collection.

Once uploaded from your computer, the image thumbnails will appear on the left. Rearrange them into your desired order.

Hide page // Since this page’s only purpose is to store our photos for the filtered gallery pages, we want to prevent this page from being viewed. To do this, simply click on gear icon to open the page’s settings, and disable the page.

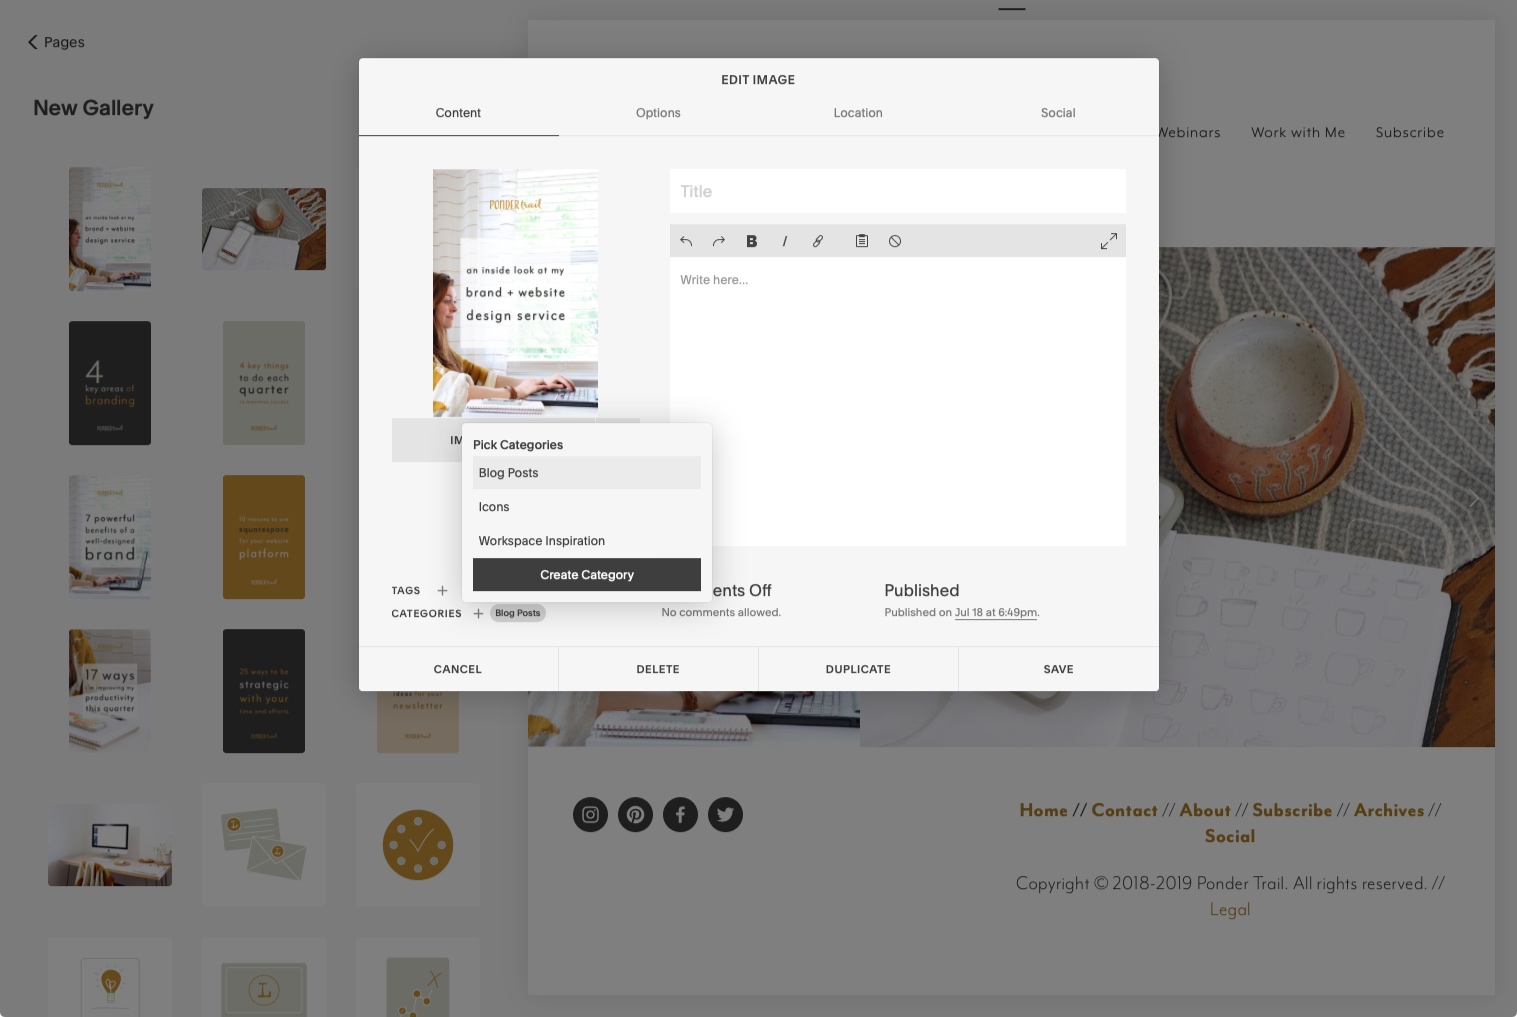
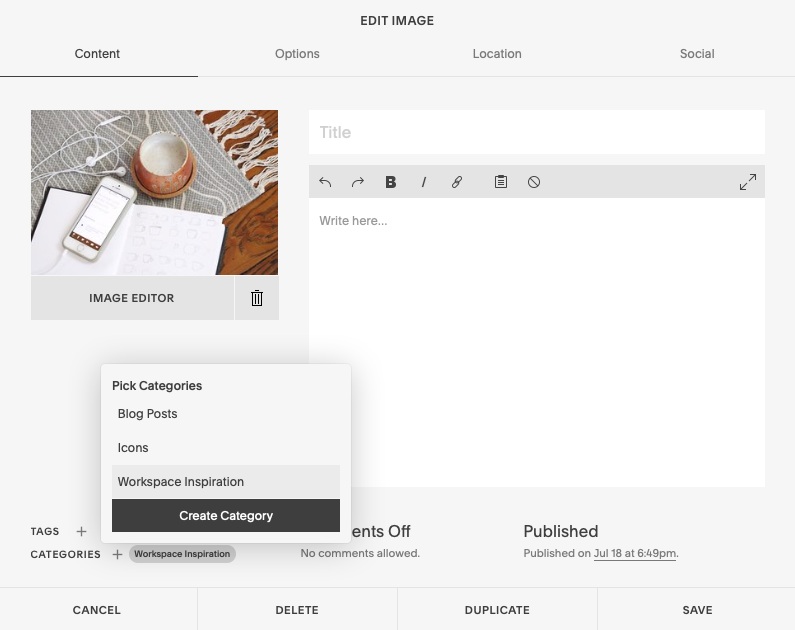
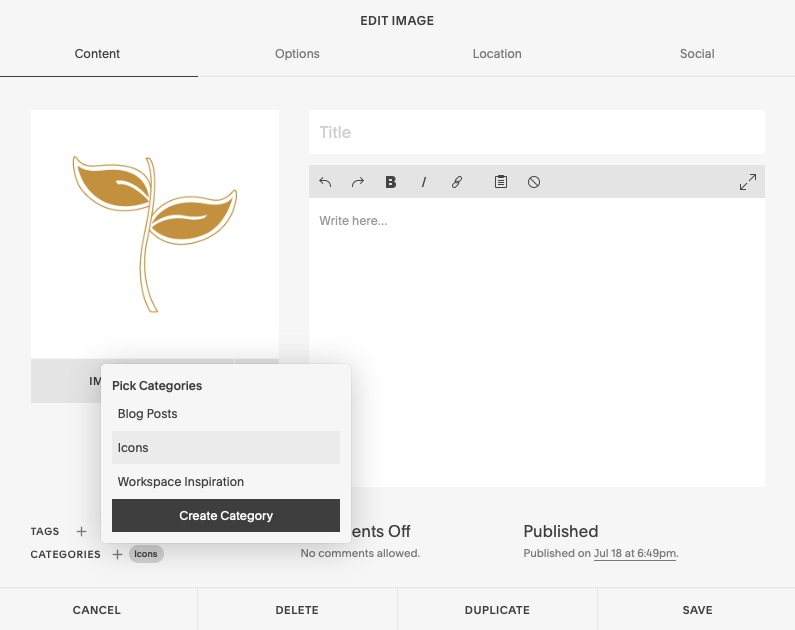
3 // Assign a category tag to each item:
For each item, hover over the thumbnail, and click the gear icon to open the settings window. You can also double click the image to open it. Then, add the assigned category. Repeat this step for each photo in your gallery collection.
I chose to create 3 categories: blog posts, workspace inspiration, and icons.
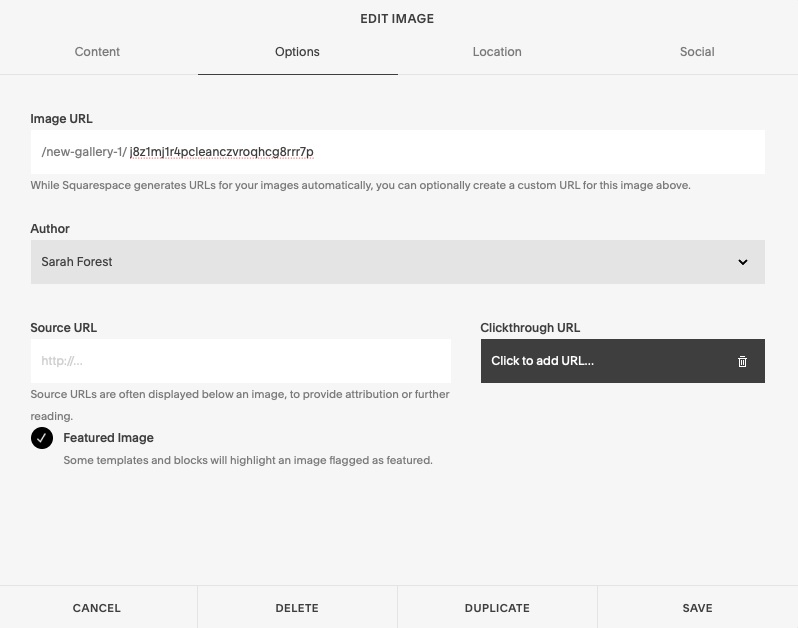
*Update: In Squarespace 7.1, it will look like this instead . . .
When you click the gear icon, the window will open up to the Content Tab of the image Settings. Scroll down until you see “Add Tags” and “Add Categories.”
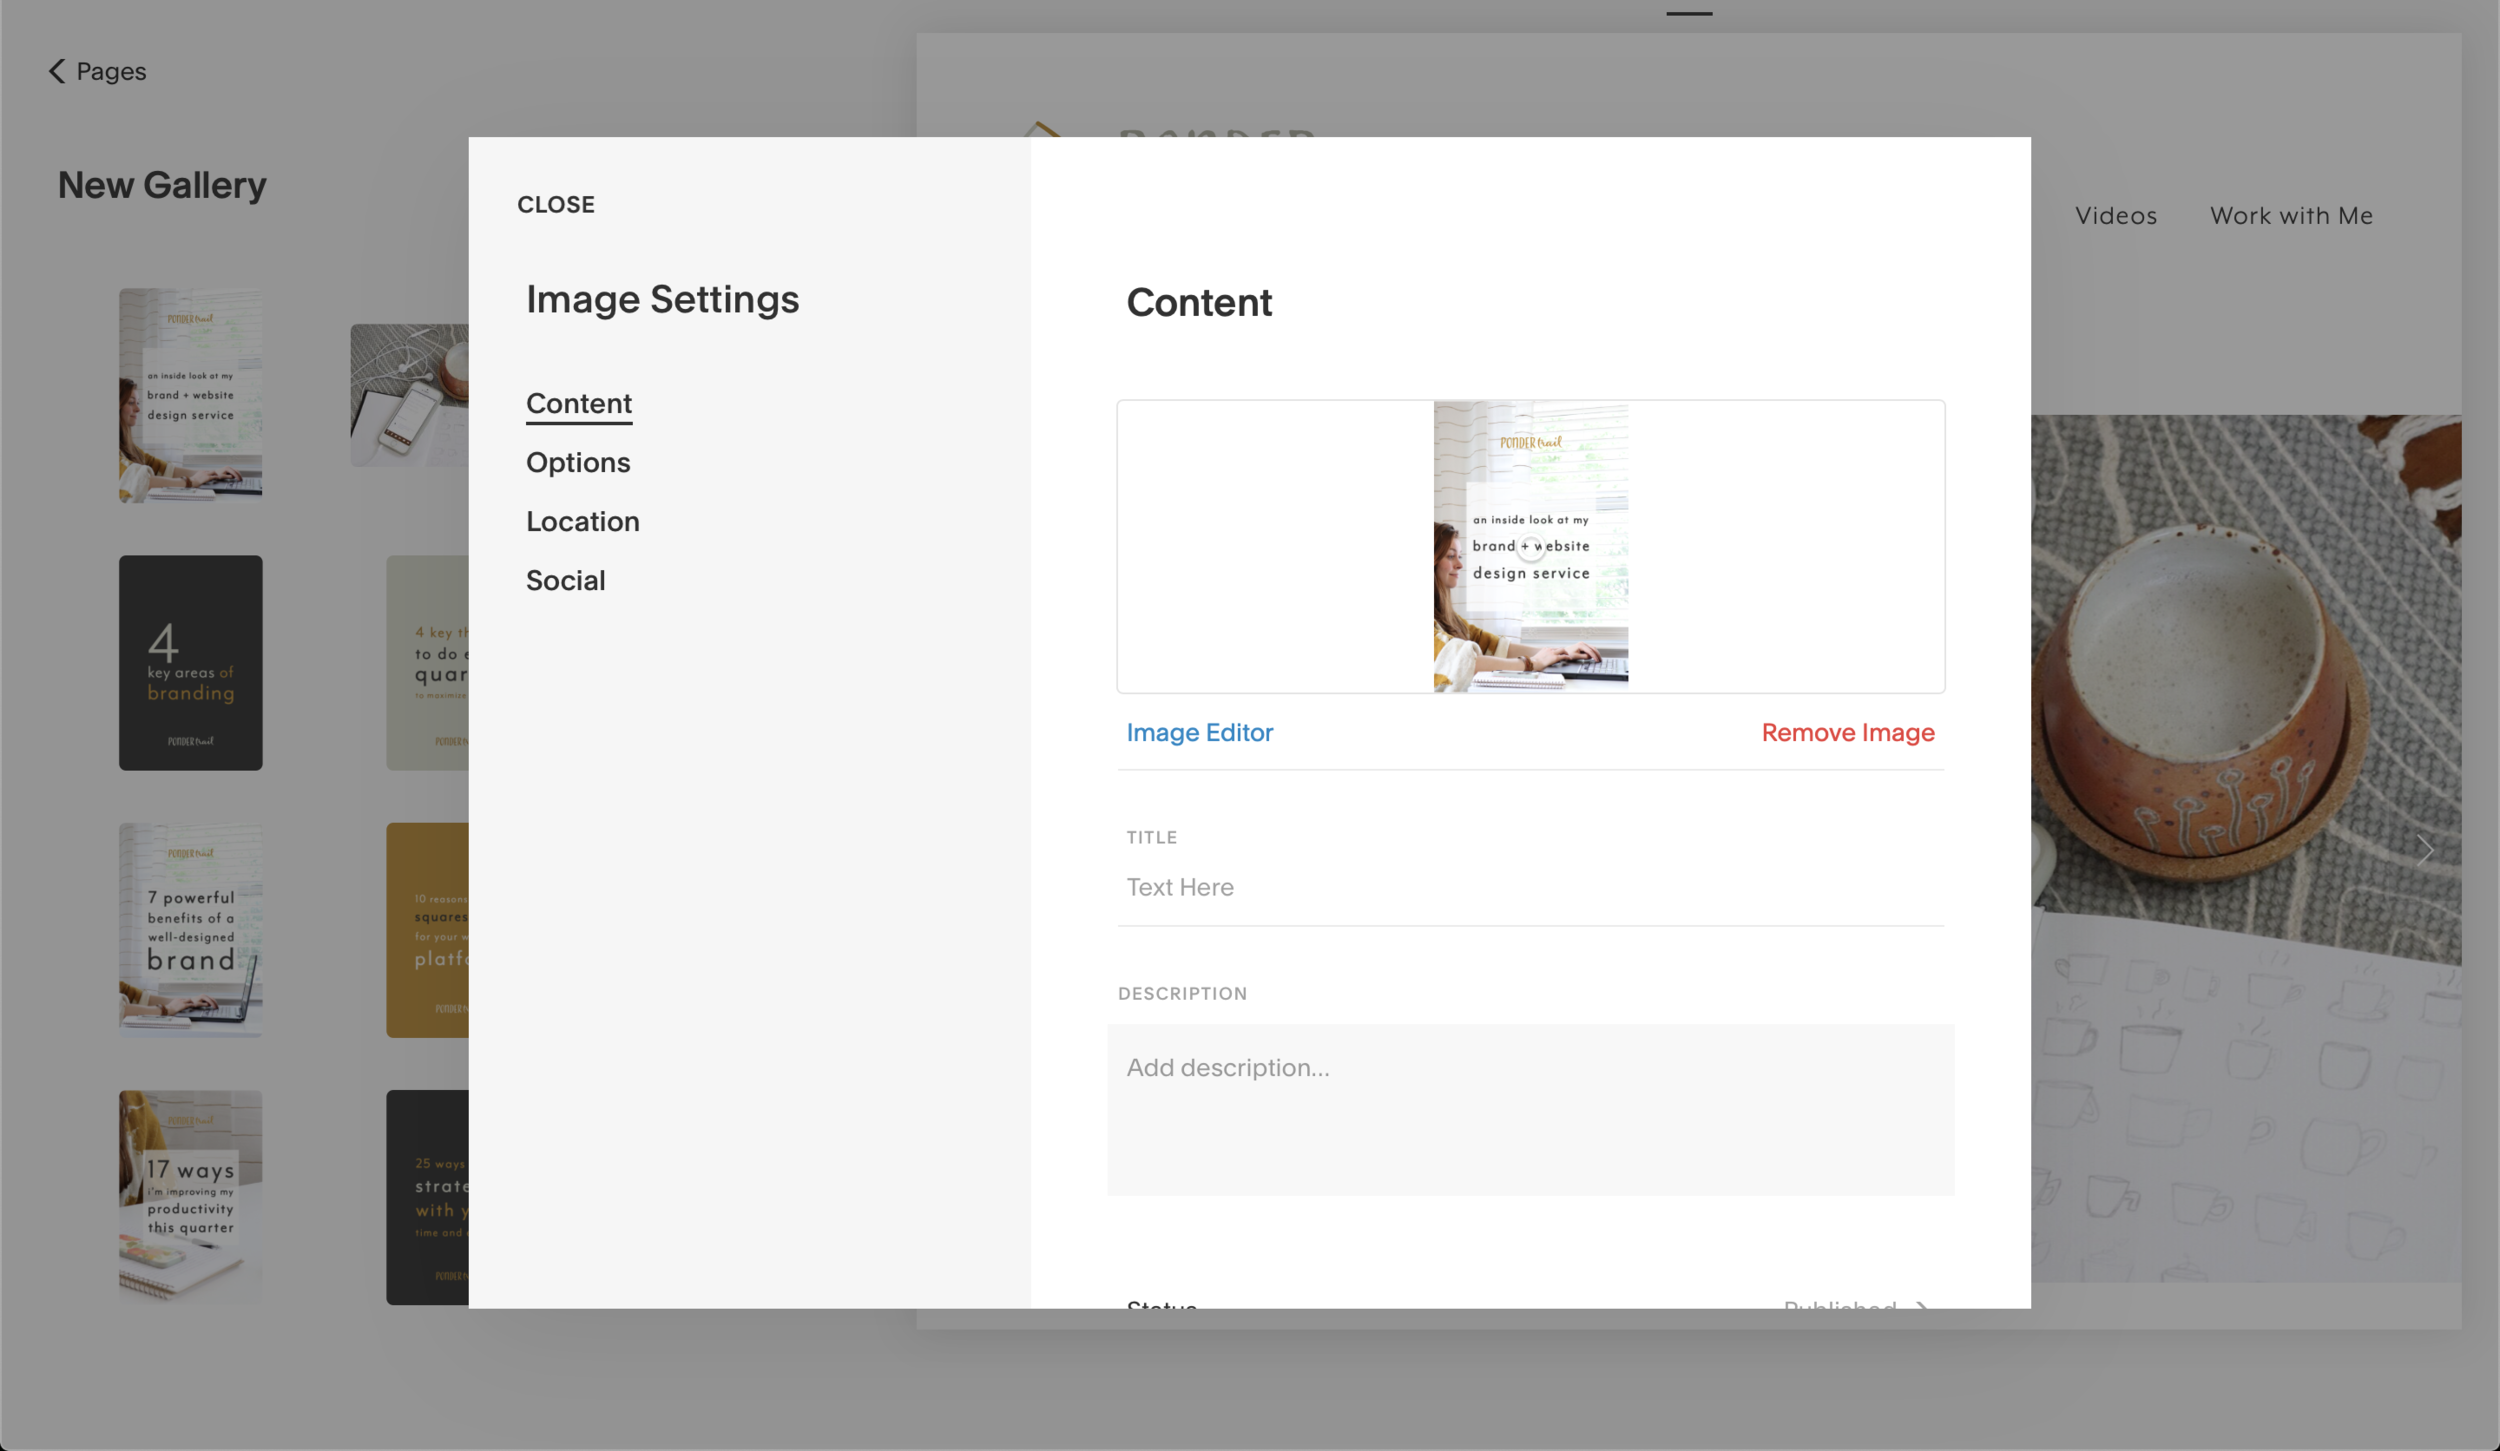
Click there to add them.

When you make changes, the SAVE button will appear. Be sure to click it once you are done.
4 // Choose a cover photo for each category:
Next, choose one cover photo for each category. These images will represent the categories on the “index” page of your filterable gallery to give people a peek and encourage them to explore your categories for more.
To make these select photos appear on your gallery index page, check the “Featured Image” circle in the settings window. You can find this in the “Options” tab.
Note: Don’t feature any other images aside from your cover photos as they will show up on the cover page.
*Update: In Squarespace 7.1, it will look like this:
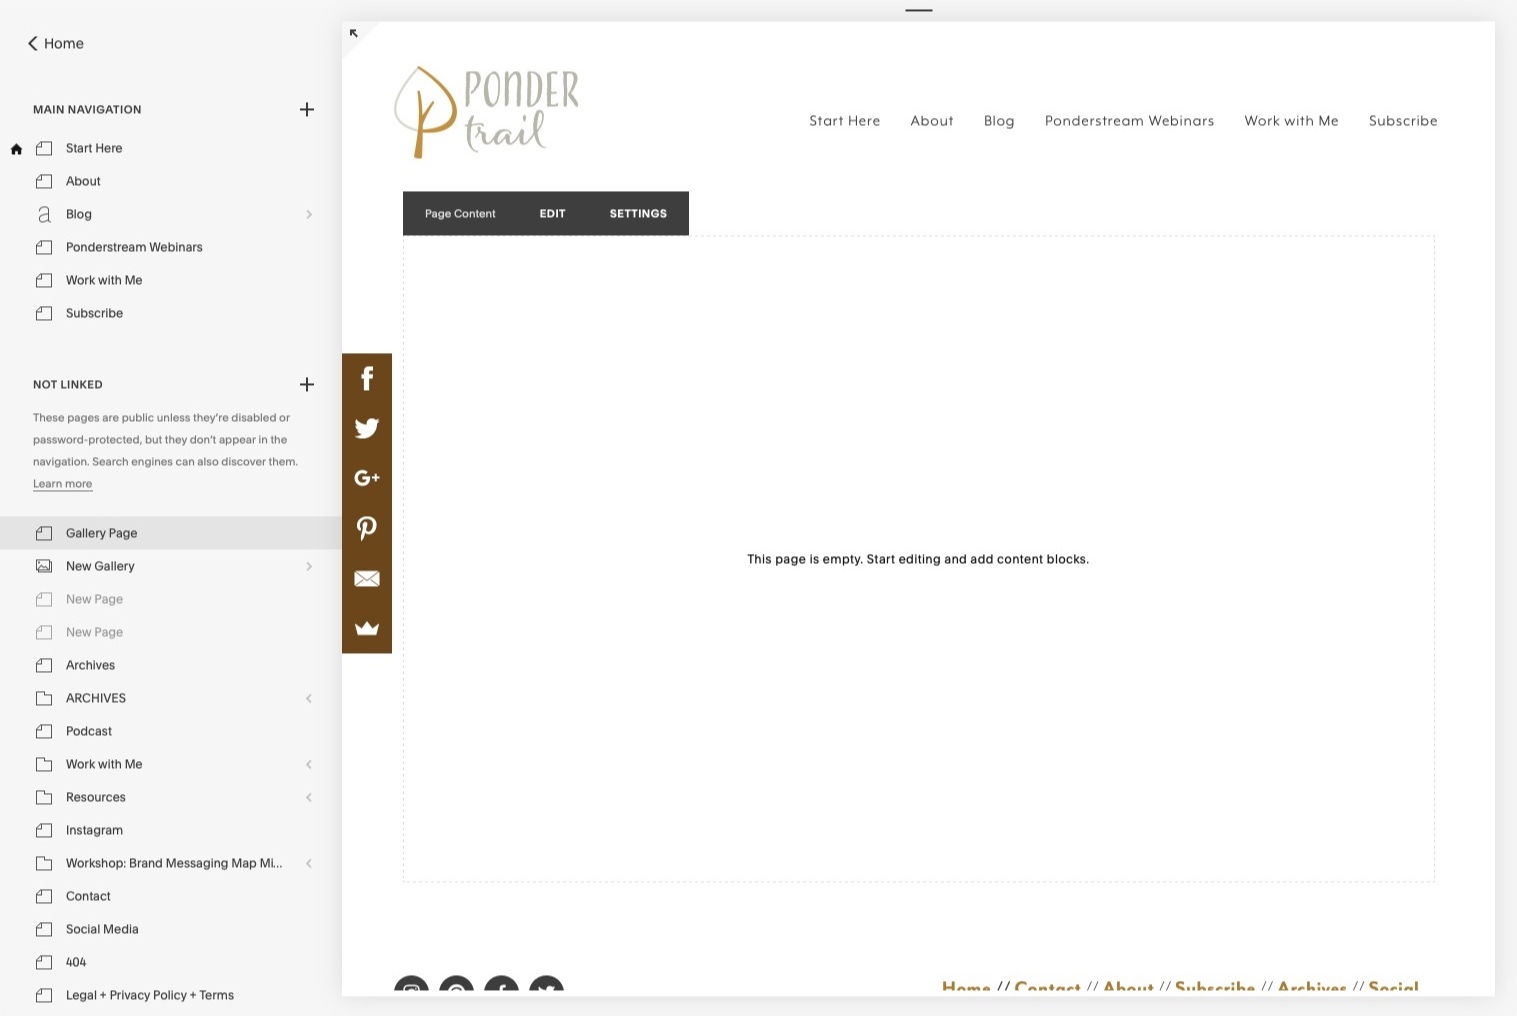
5 // Create and design your gallery index page:
Once you’ve finished uploading and tagging your photos, click back to your pages with the arrow in the top left hand corner.
Back on the pages screen, click the plus sign again to create a new, blank page.
This will be your index gallery page. You can think of it as a homepage for your filtered galleries that shows the categories available for viewing. After its mostly set up, we will duplicate this page to save you from repeating a few steps while creating the pages for your specific categories.
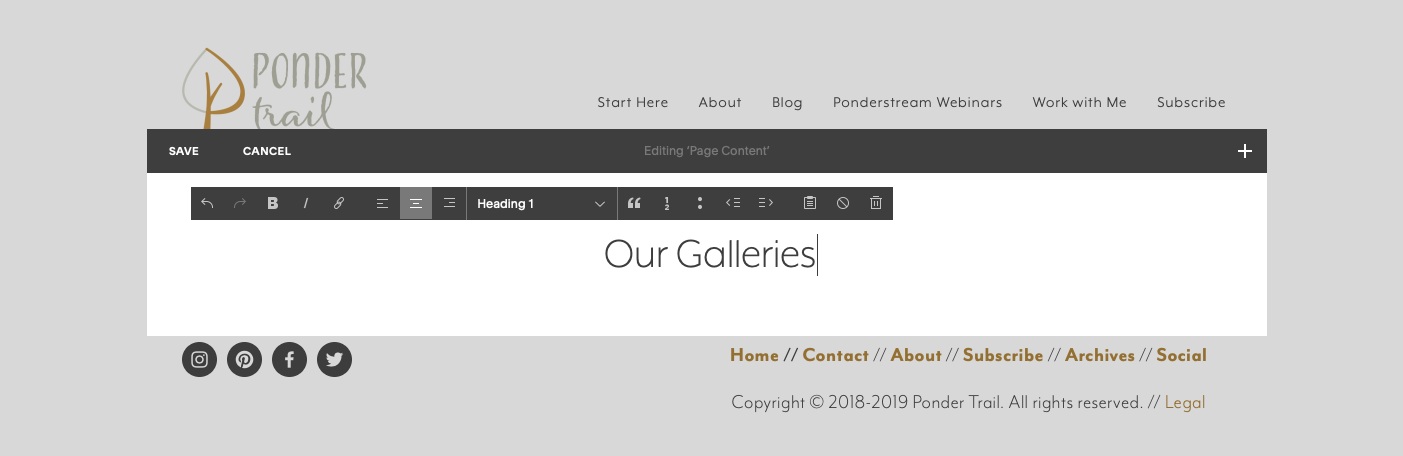
Click “EDIT” to start building your page.
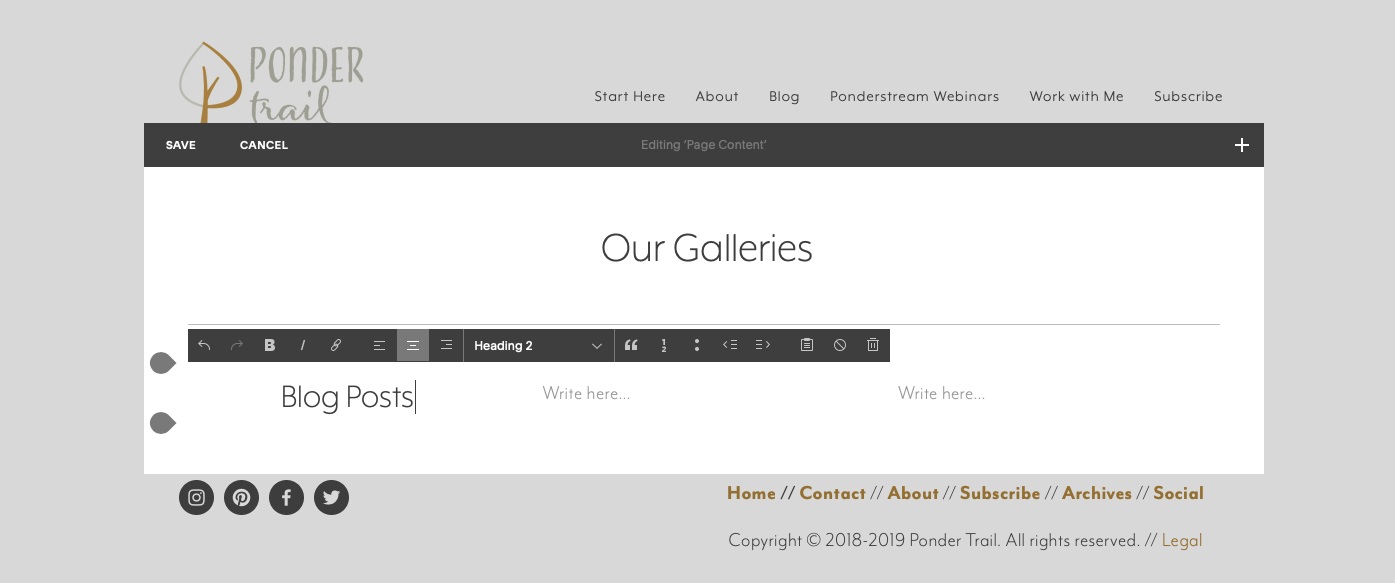
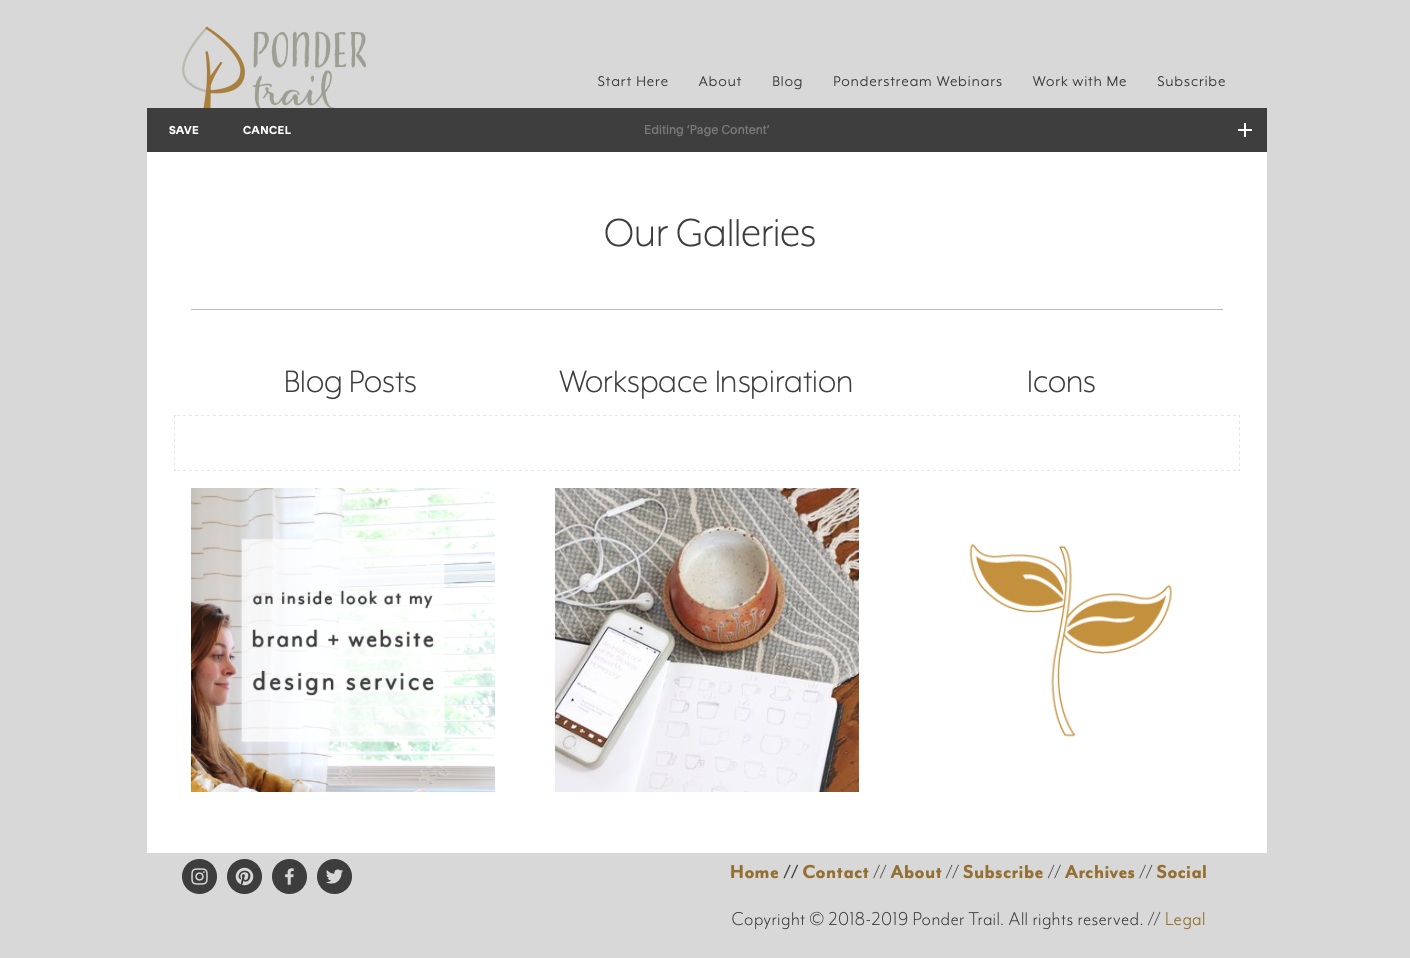
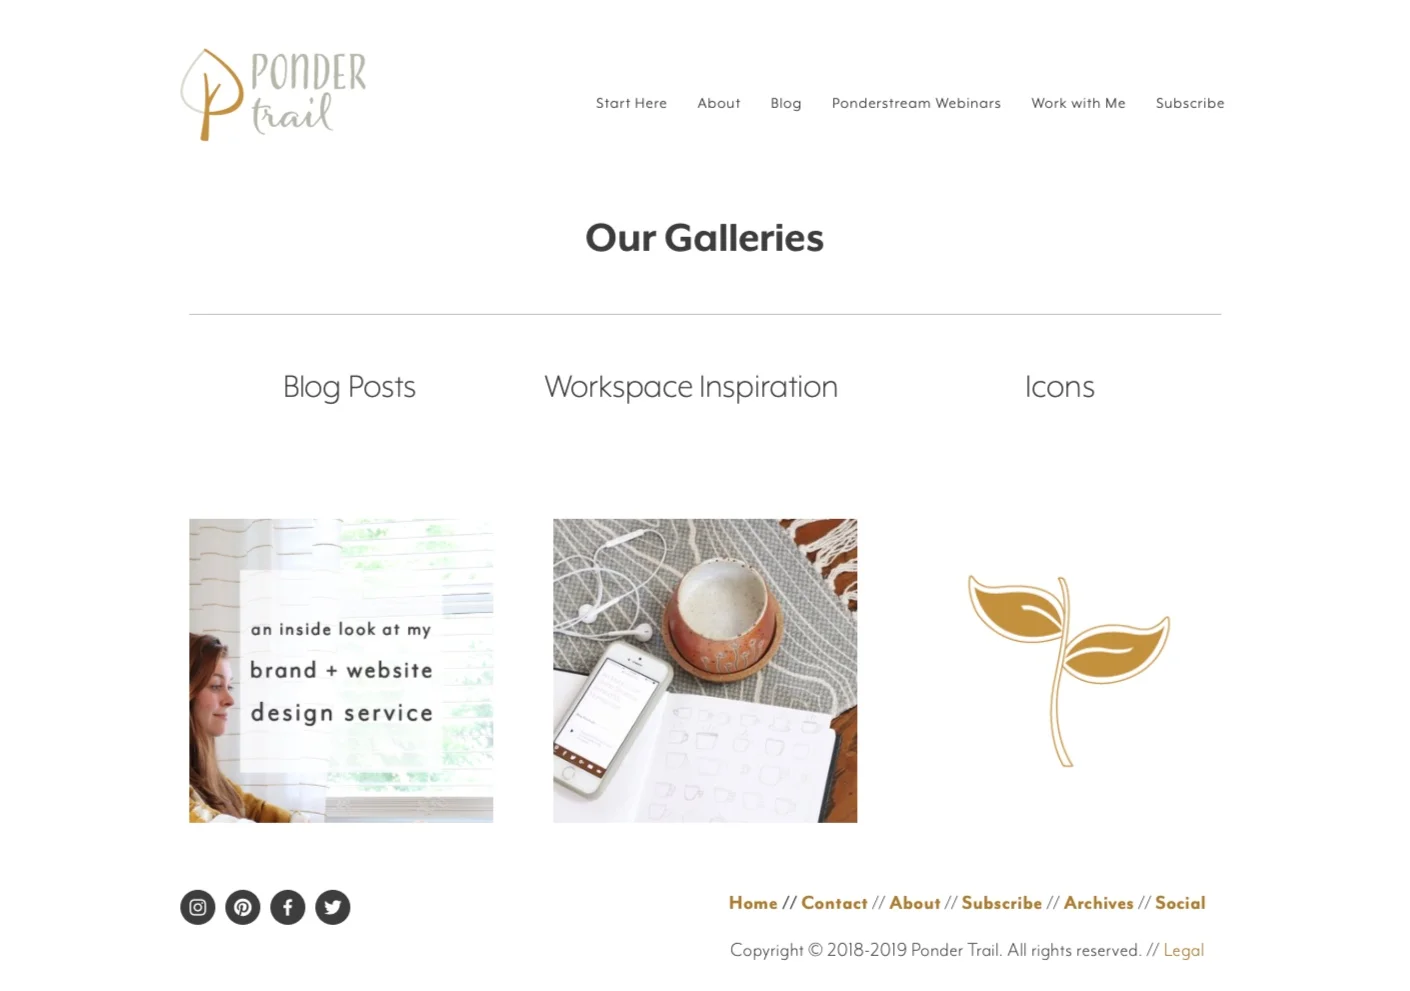
Add an index title: In the text block, type in a title for your index page. I wrote “Our Galleries.”
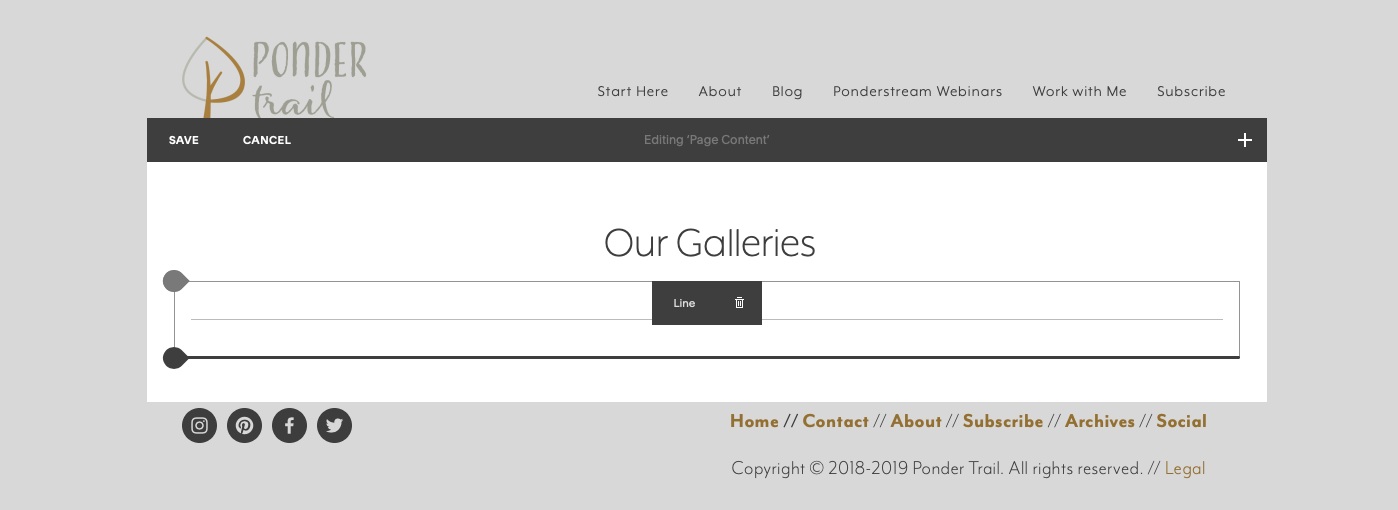
Next, we’ll add a line to separate the title from the rest of the page content.
Hover over the teardrop shape below the text block until a line appears.

Click the teardrop shape to insert a new content block. Select “Line.”

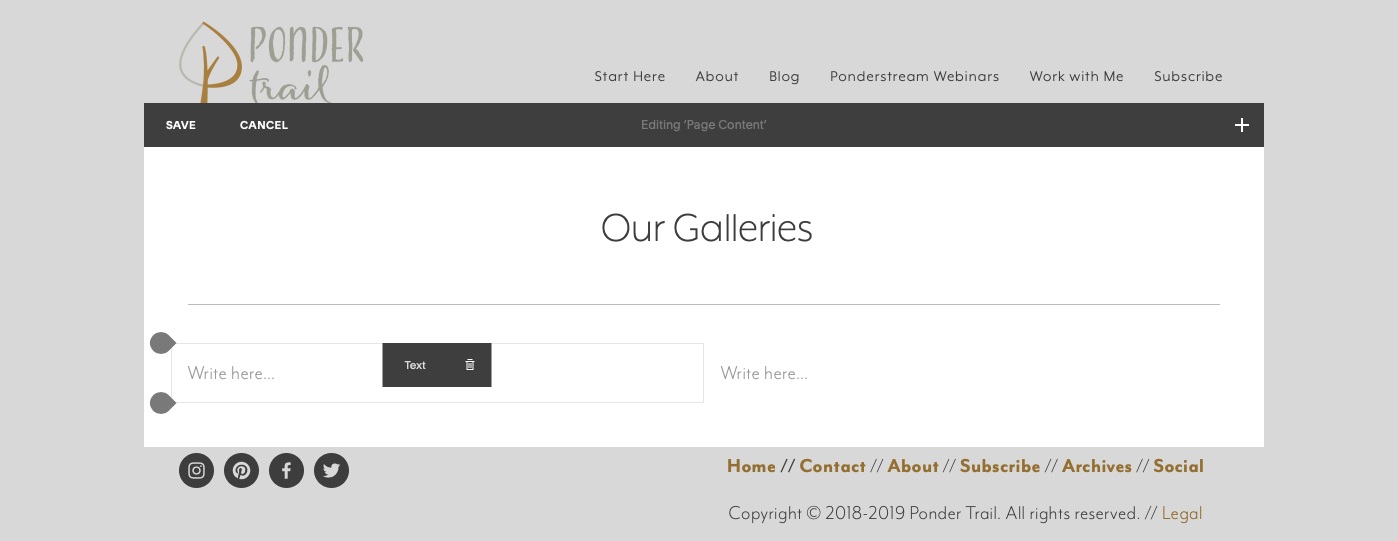
Create index navigation headers // Next, we’ll add text blocks side by side below the line—one for each category. Each text block will have one category title in it, which will eventually link to its corresponding page. These will eventually serve as navigation headings for your galleries. This will allow your audience to click through your galleries and view their contents.
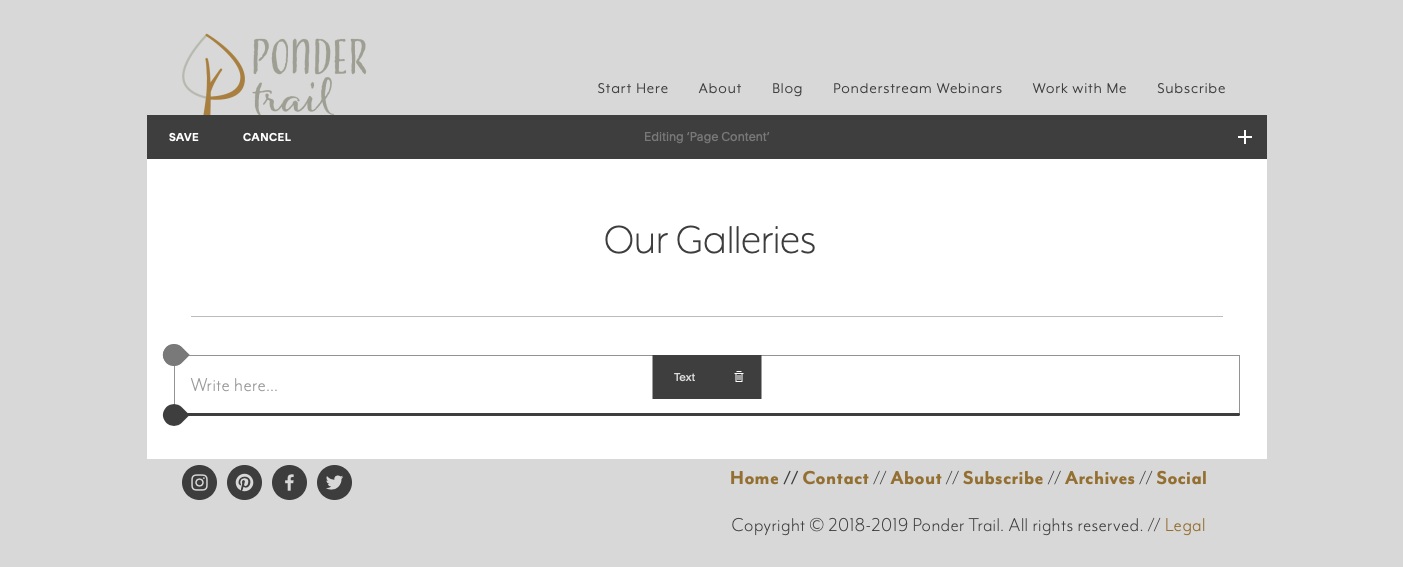
I added two spacers, and dragged them so they were side-by-side. Then, I added one more below, and dragged it next to them. This resulted in three text blocks all in a line—one for each category.
Text Blocks Hint: If you insert three text blocks on top of each other at once, they tend to join together. So it’s helpful to insert two, move them into place next to each other, and then add the third one. Then you can proceed with with rearranging them.
Then, type your categories into the text blocks to create navigation headings. We will come back and add in the links in just a few steps after we create their pages.
I added one more space block to keep a little distance between the navigation headers and the gallery below.

Add your gallery content with a summary block // Next, use the teardrop shape again to insert your gallery images.
In the content block menu, in the Summary section, click “Grid.”

When the gallery grid appears, it will look something like this:
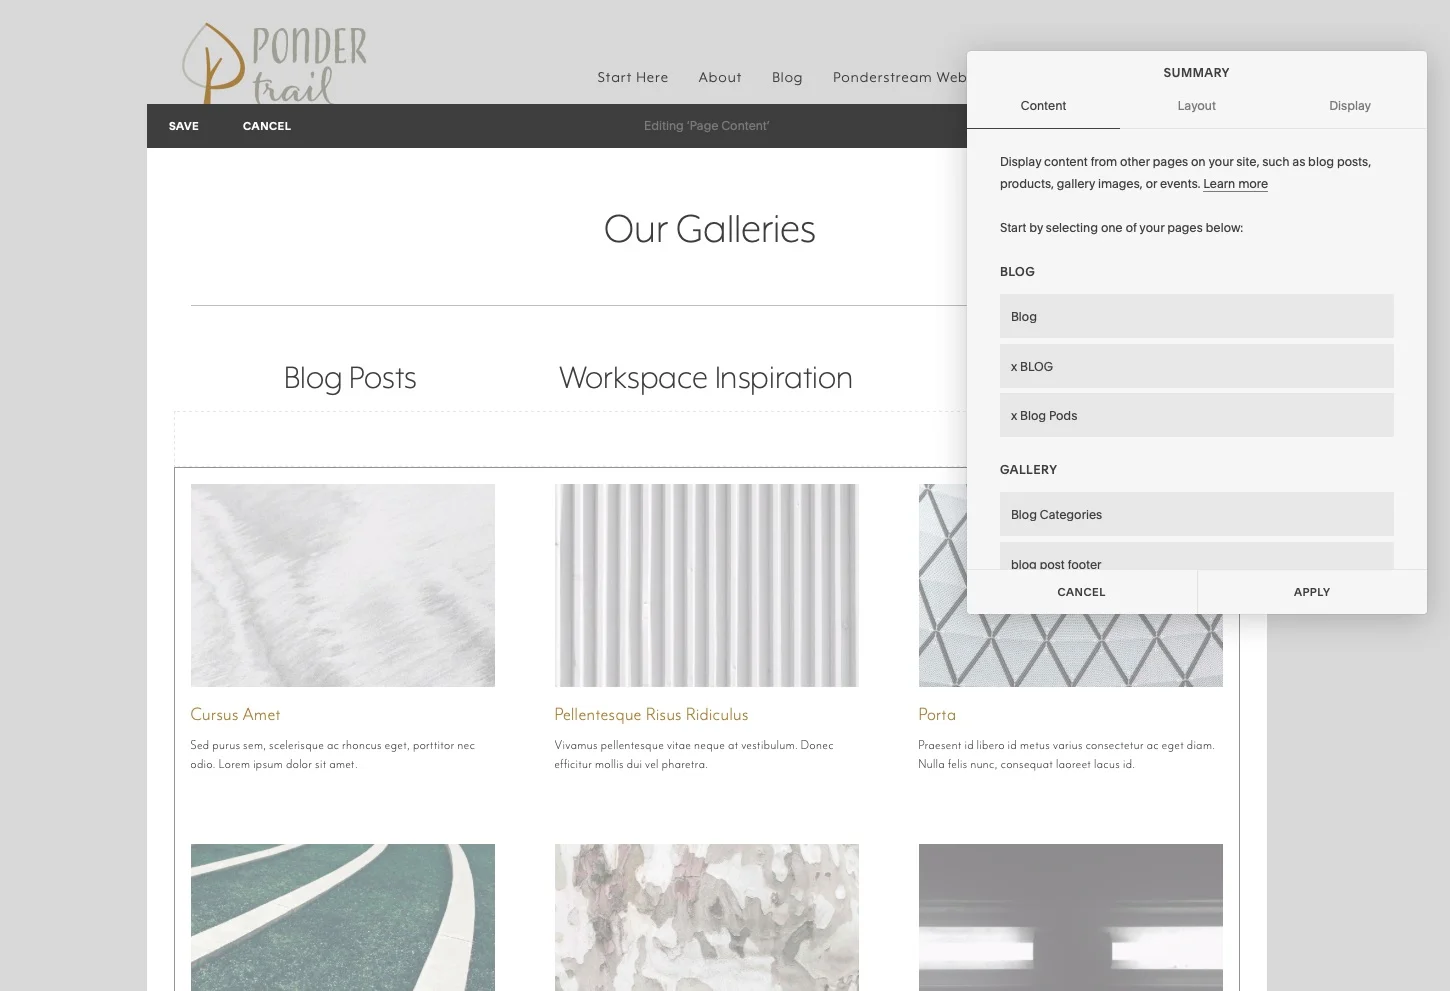
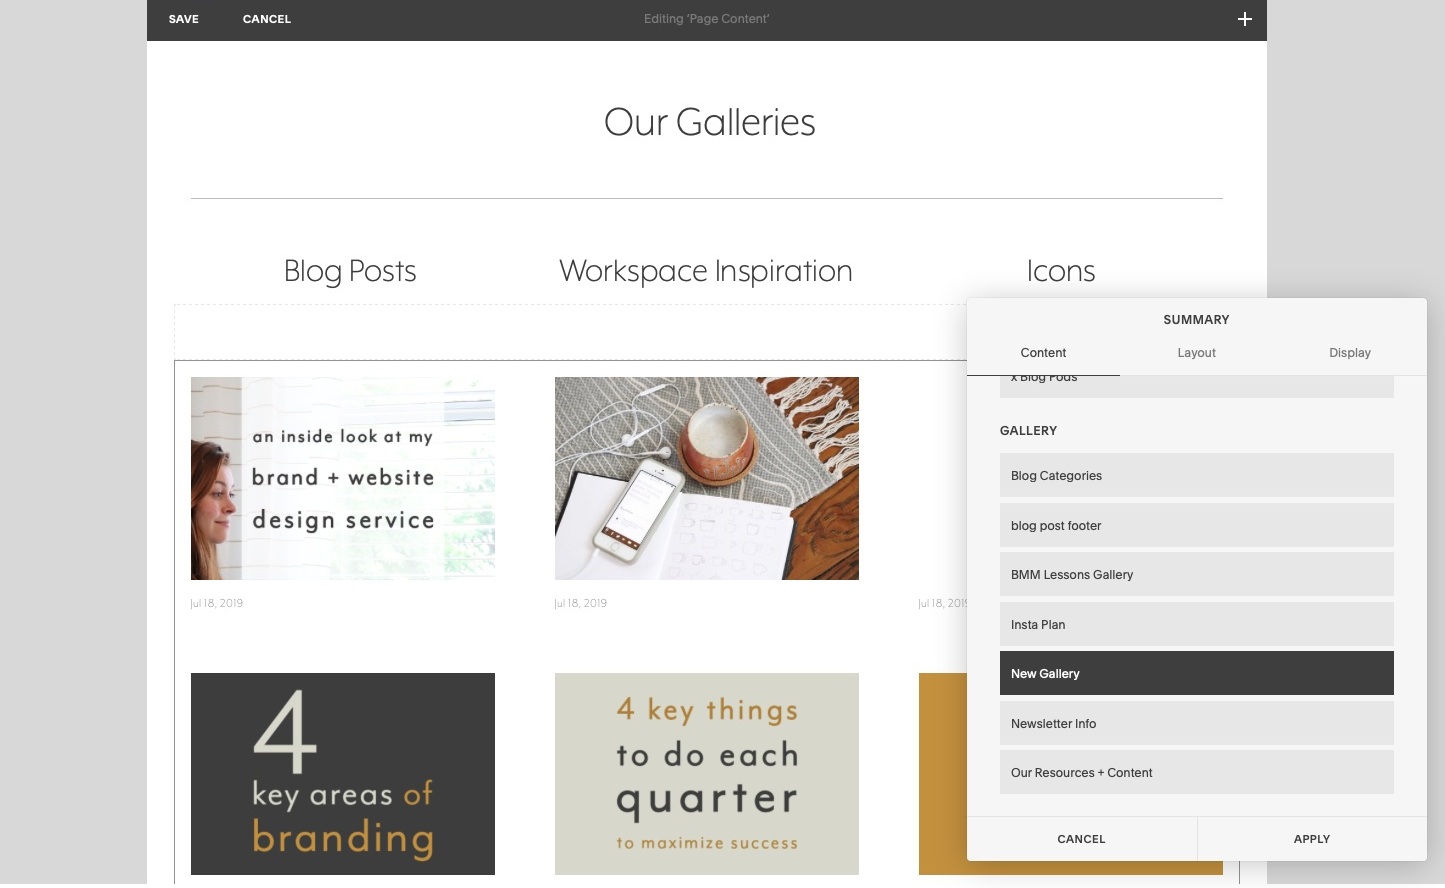
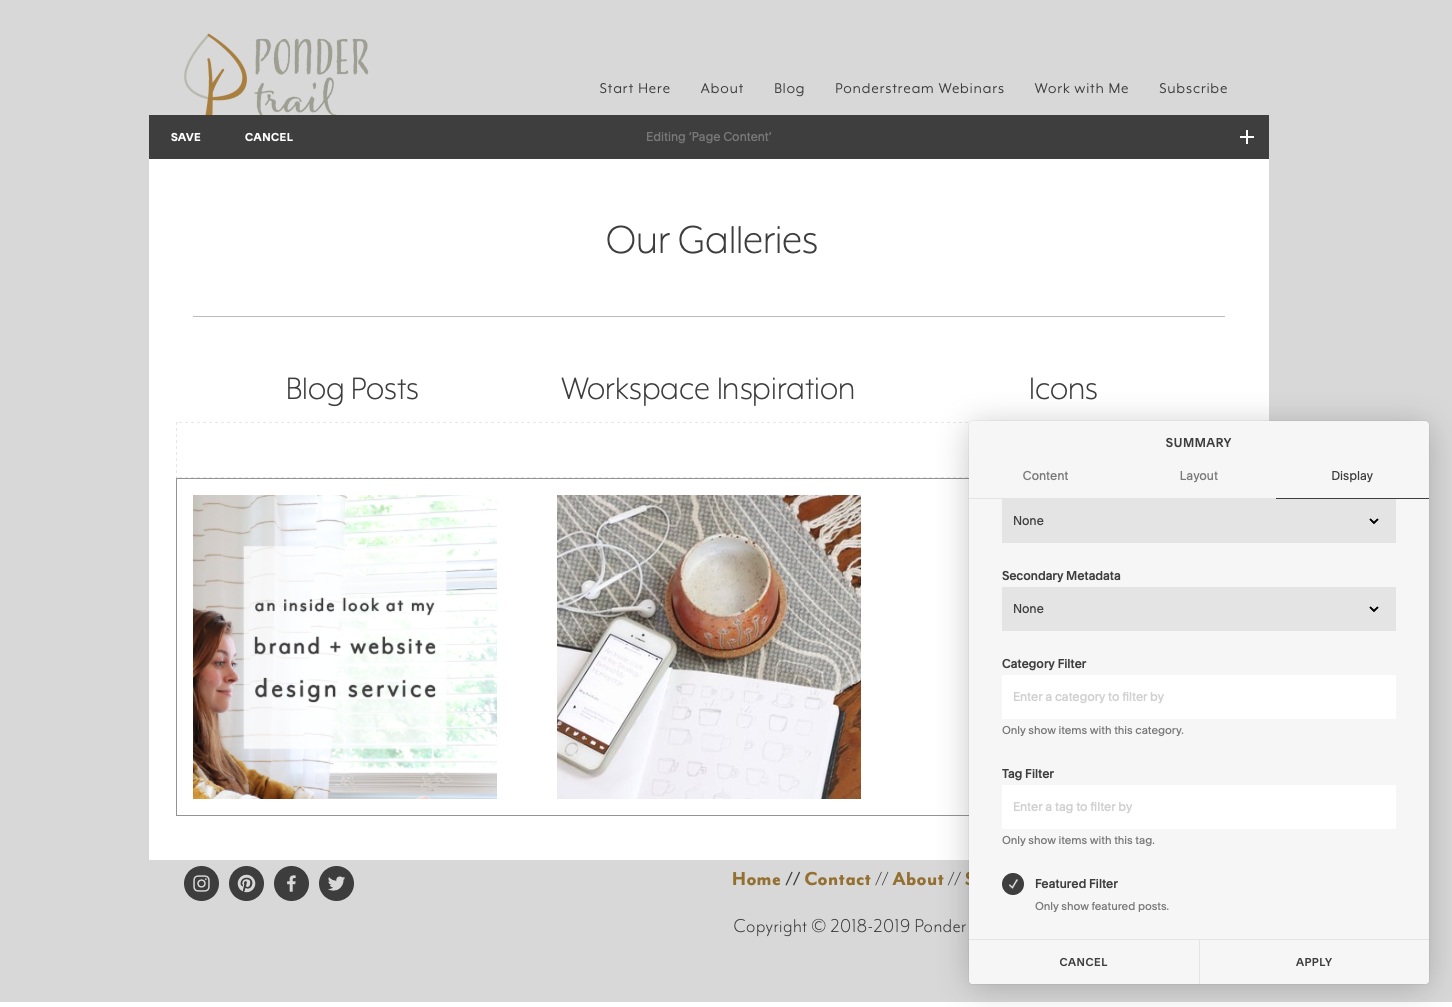
Content // In the summary settings, choose the gallery you created at the beginning of this blog post to pull in your content. Your images will appear.
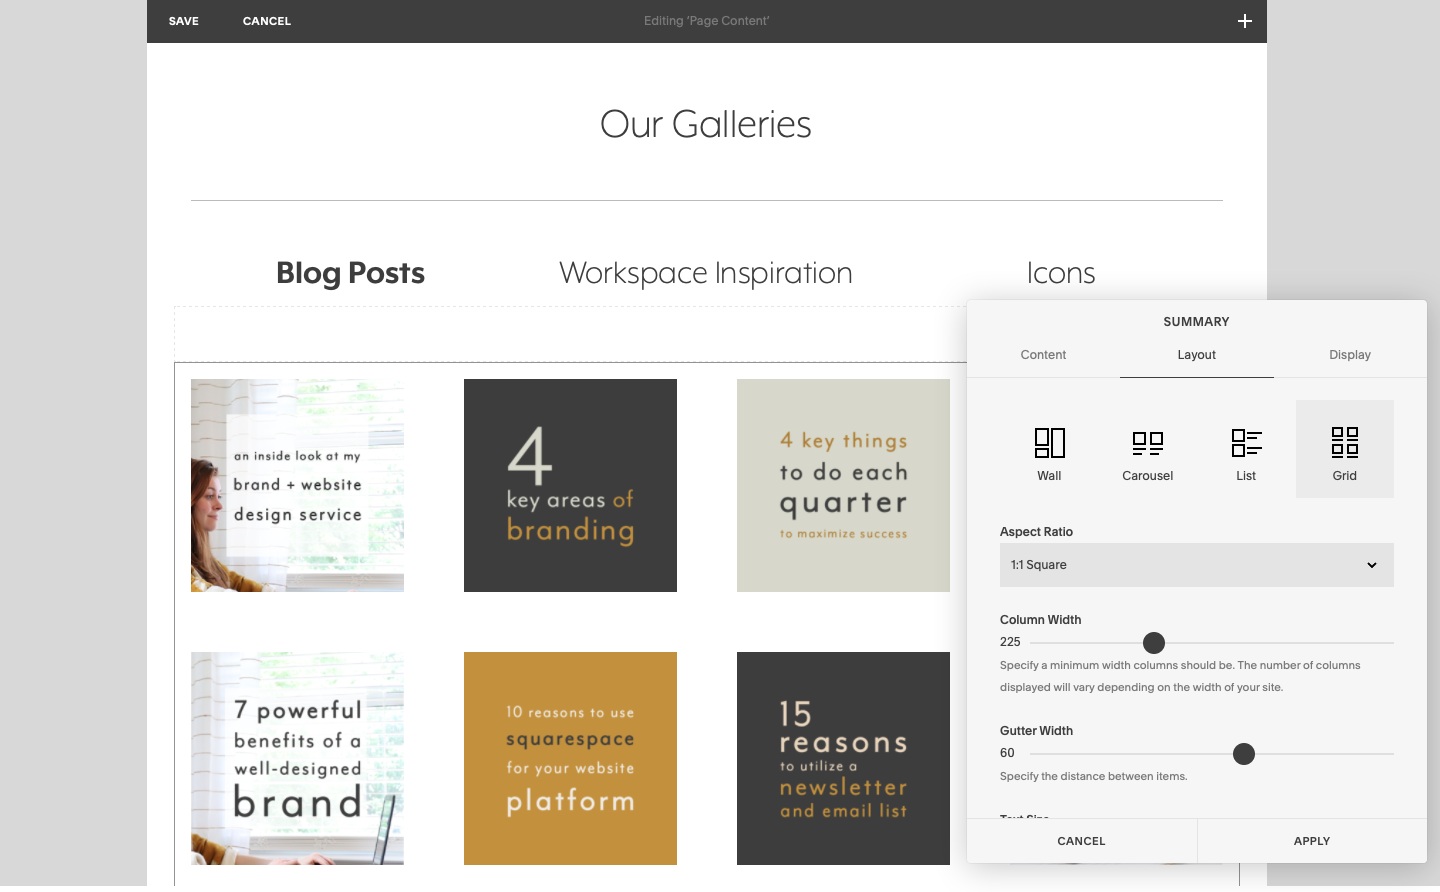
Layout // Adjust the summary settings to get your desired style. I set the image ratio to 1:1 square and adjusted the column and gutter widths to 270 and 60 respectively.

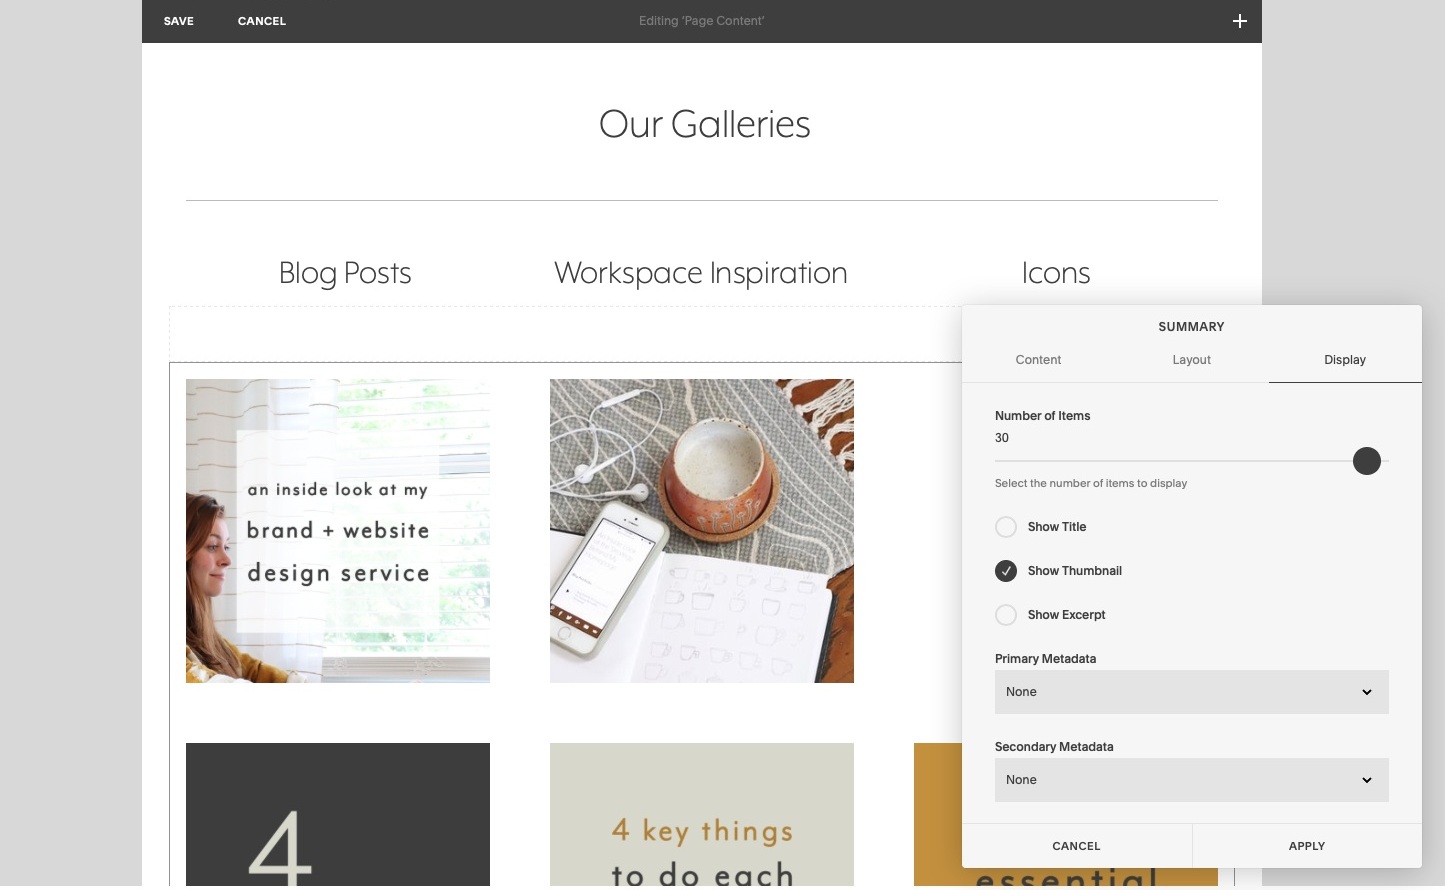
Display // Then, remove the default date from the primary metadata and choose to show only the thumbnail. Set the number of items to 30 (the current maximum).
Since this is the index page of your filtered galleries, be sure to check “Featured Filter” so it only shows your chosen cover photos—one for each category—from Step 4. Click “APPLY.”
This creates the outline of your cover page and a template for your filtered gallery pages. Click “SAVE.”
6 // Create filtered gallery pages—one for each category.
Now it’s time to create a page for each filtered gallery.
To save yourself from building each page from scratch, simply duplicate the index page you just created to use it as a template.
Hover over the page title in the left-hand menu, and click the gear icon to open up the page’s settings.
In the “General” tab on the left, scroll down to the bottom, and click “Duplicate Page,” then “Confirm.”

Duplicate this page for each category filter.
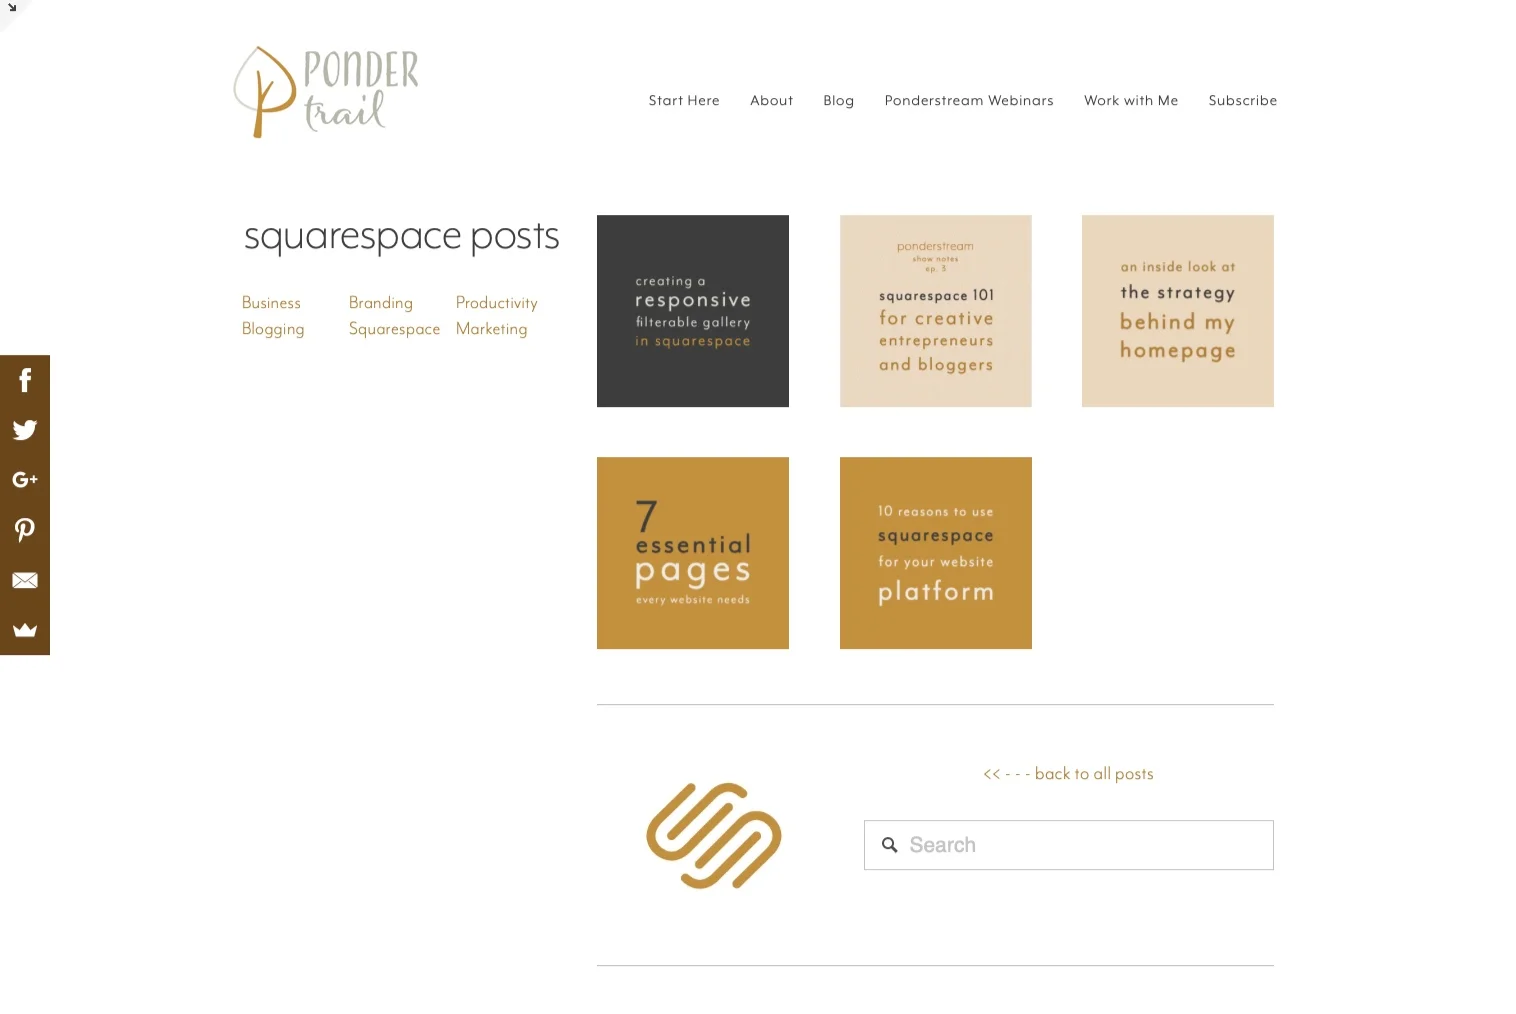
Rename pages // Rename each page to distinguish which category will be showcased on it. (Make sure they are recognizable as you will be selecting these from all of your website pages in a moment when you add links to your gallery navigation.)

Customize URL // Adjust the URL slug, for each page, too.

7 // Customize and configure each page:
Now that you have all the necessary pages created, it’s time to add the final details and customizations.
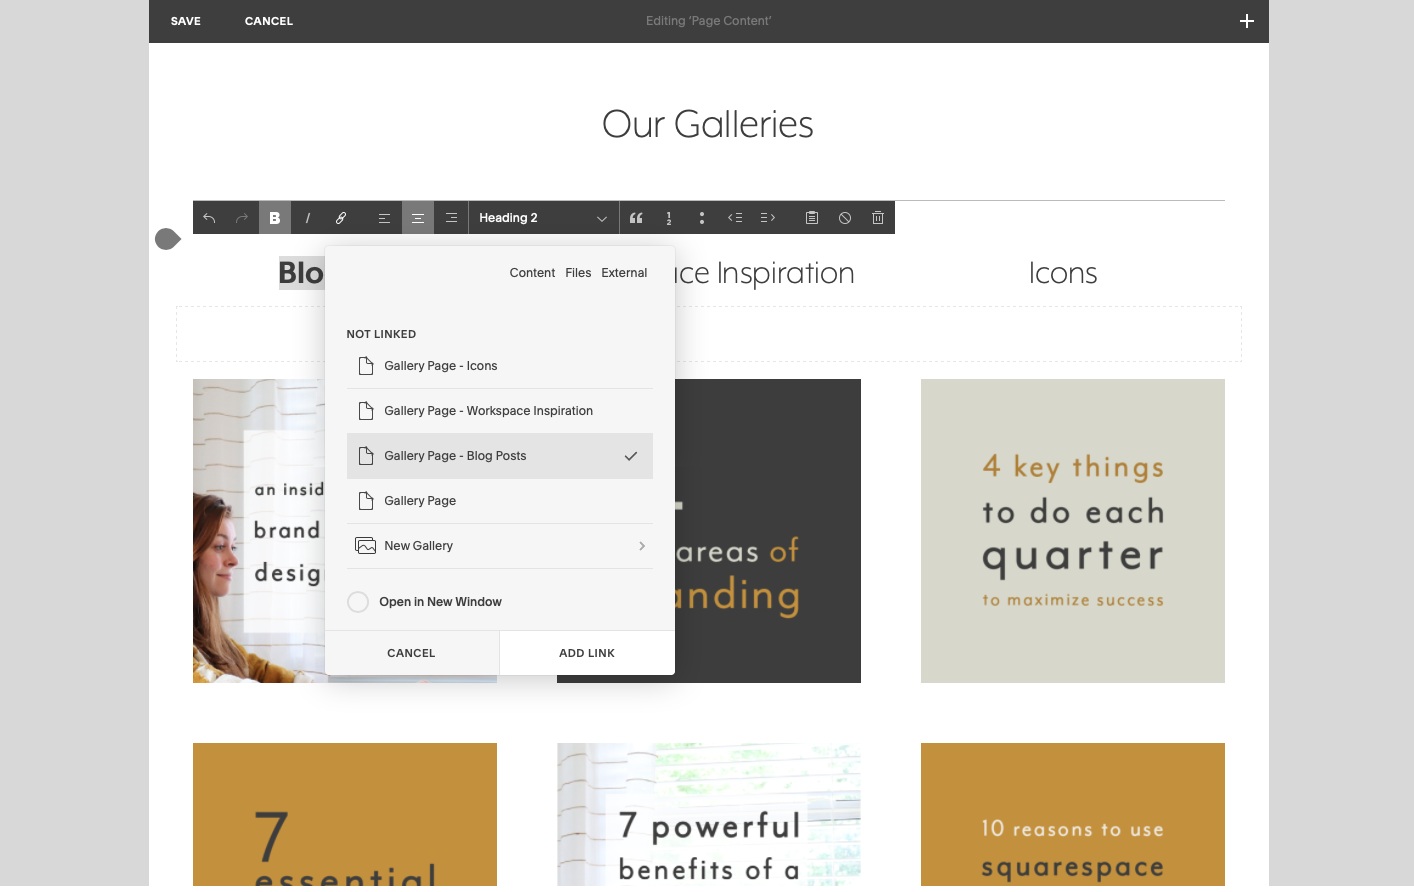
On each page, make the text bold for that page to emphasize the current gallery being viewed. And for each category in your header navigation text, add internal links to link to their corresponding pages.
This makes the category navigation headings clickable so your audience can switch between galleries. Since the headings stay the same—except for the bold text to indicate the current gallery—it makes it feel like you’re not even leaving the page, which gives the desired effect of this Squarespace workaround.
Note: Don’t select “open in new tab” otherwise you won’t end up with the filtered gallery effect.
Then, adjust the summary grid settings so the proper gallery is shown by adding a filter.
In short, make these adjustments on each page to customize the results that show when a user clicks on the category headings:
1 // Bold the current page title (this will be different for each page)
2 // Add navigation links (this will be the same for each page)
3 // Add summary grid filter (this will be different for each page)
4 // Select “Featured Filter” for index page only. Unselect for category pages.
INDEX PAGE:
Start with the index page—the first one you created and used as a template.
Make its title bold.

Add the link to its matching page in the title. And add links to all of the headings, too.
To add a link, first highlight the text area that you want to be clickable, then click the link icon. Select “Content,” and choose your destination. For this purpose, don’t select Open in New Window.

That complete your Index page. Be sure to click “SAVE.”
CATEGORY PAGES:
Now it’s time to customize your filtered gallery pages. Follow these steps for each category page you have.
First up, is my Blog Posts gallery page.
Bold the page’s title in the navigation.

Add links to all of the page titles to create your live navigation.
Display: Add the corresponding category filter. Unselect “Featured Filter” to make your images tagged with that category appear.

Layout: You can change how many images show on a line, too. On my Blog Posts gallery page, I upped it to four by adjusting the column width to 225.
When you are done, click “SAVE.” Then, go back and repeat the process for each page.
I did this for my Workspace Inspiration gallery page.

And for my Icons gallery page.

And now your filterable gallery is complete!
8 // Test your filterable gallery on your Squarespace website.
The final step is to click through all of your links on each page to make sure everything is in working order.

Take a look at the final results:
Here’s a video to show you how this gallery workaround turned out:
Taking it to the next level:
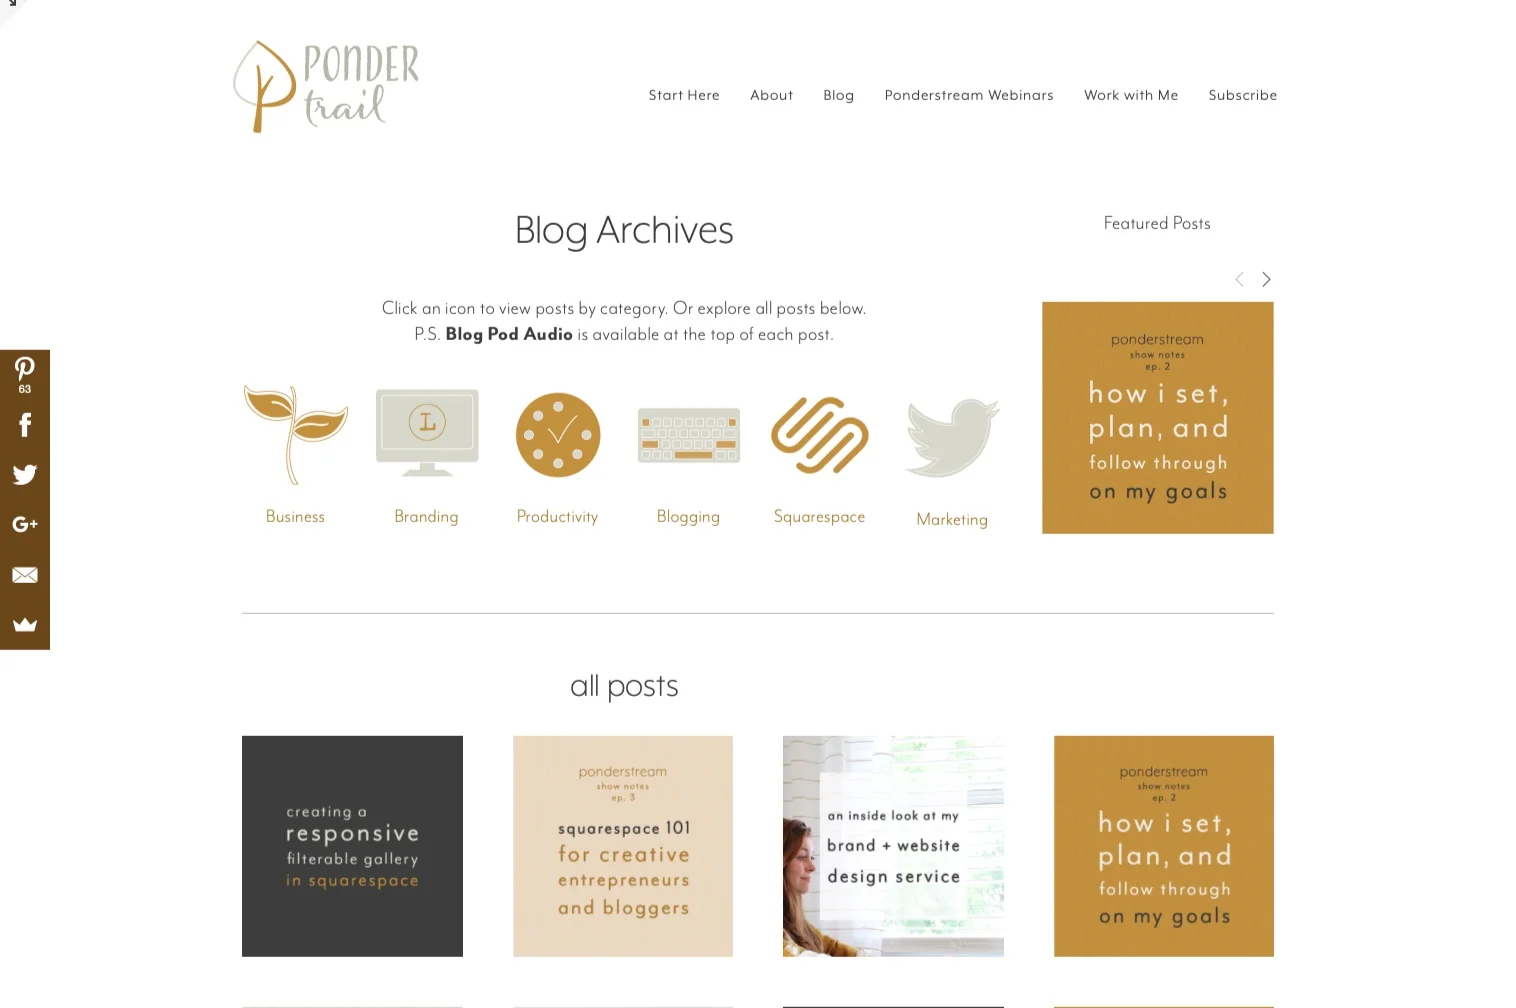
I used the basics of this technique to create my blog archives pages. I took it a step further, however, and designed a cover page that was different from the rest:
Hopefully this Squarespace workaround will come in handy for you, too! It’s a great trick to have up your sleeve for all of your category filtering needs. Have you ever created a filtered gallery or something similar for your website? I would love to know. Leave a comment below!